Step 9. Prepare and launch advertising campaigns on Facebook
Facebook users turn out to be the most financially reliable audience comparing to other network users. This advertising platform is suitable for almost all dropshipping stores. With Facebook ads, you can get purchases for a very cheap price. However, not every dropshipping store manager places ads here. Why?
The answer is simple:
- There are too many settings and interface is pretty complex
- Without any assistance, it’s hard to understand where to start and how to do it correctly to save money and get good results
So, keeping these reasons in mind, we decided to make this step-by-step guide for you. It will definitely be of some help when making your first step in Facebook advertising and getting your first sales. We’ll gladly share our experience with you on creating, launching Facebook ads and adjusting tricky advertising settings. But if you don’t have time for all that, just order ready ads here.
How Facebook targeted ads work
Targeted ads are ads that a user shows to other users according to set ads settings.
Here are some of them:
- Gender
- Age
- Place of residence
- Demographics (education, relationship status, etc)
- Interests (business, children’s clothes, etc)
- Behavior
Facebook constantly analyzes user’s interests and behavior on facebook.com, in the Facebook app and beyond. It monitors what a user likes, publishes, follows, reads, uses as a device and from where he/she logs in.
That’s why Facebook is pretty good at defining what users meet your ad targeting parameters and showing your ads to people who would be really interested.
But before you start setting up ads, make some preparations.
Things to do before launching Facebook ads
If you want your FB ads to produce the desired effect, do the following.
Create a Business Page – the page of your dropshipping store on Facebook. Without it, you won’t be able to use the most effective ad formats – so it’s necessary to create it.
Here’s an example of a Business Page:
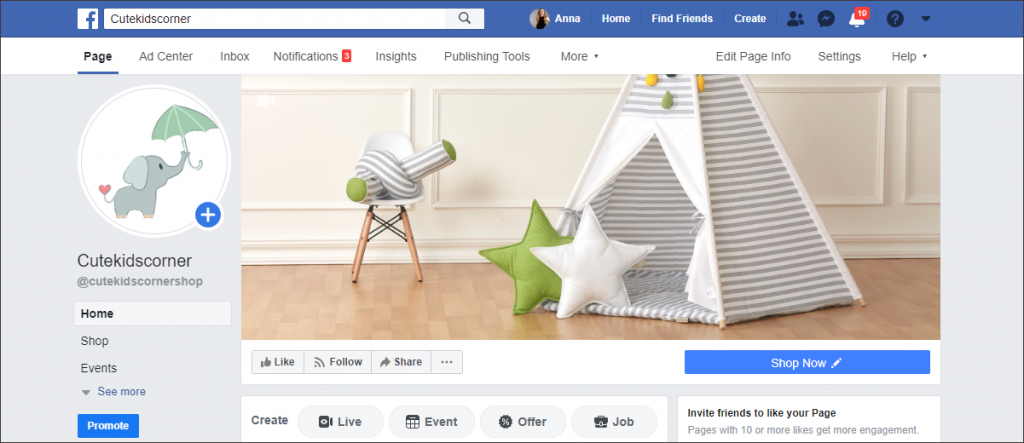
A Business Page can be made in 2 clicks – and it will be enough for ads launch. However, we strongly recommend you to fill it out coz it won’t really take long.
A detailed tutorial on creating a Business page is in one of our previous articles.
Set up Facebook Pixel on your site
Facebook Pixel is a javascript that allows tracking users’ activities (from their phones, tablets, and computers) on your site, analyze advertising campaigns and increase their effectiveness.
Why do we need FB pixel?
Well, after its set up, you can:
- Track conversions (events) on your site
- Optimize ads for needed conversions (events)
- Create customized audiences
- Create lookalike audiences
In other words, the pixel will help you to get greater results!
Actually, to set up the pixel is not obligatory but we still recommend to do that. We’ll tell how to use it further in the article.
Read how to set up Facebook Pixel here.
And now let’s move on to the most exciting part: How to launch ads on Facebook
Step 1. Choose an objective of your Facebook advertising campaign
What’s an objective and its use?
The objective is a thing that tells Instagram what result you want to get from your ad. At the moment, there are 11 objectives in 3 categories.
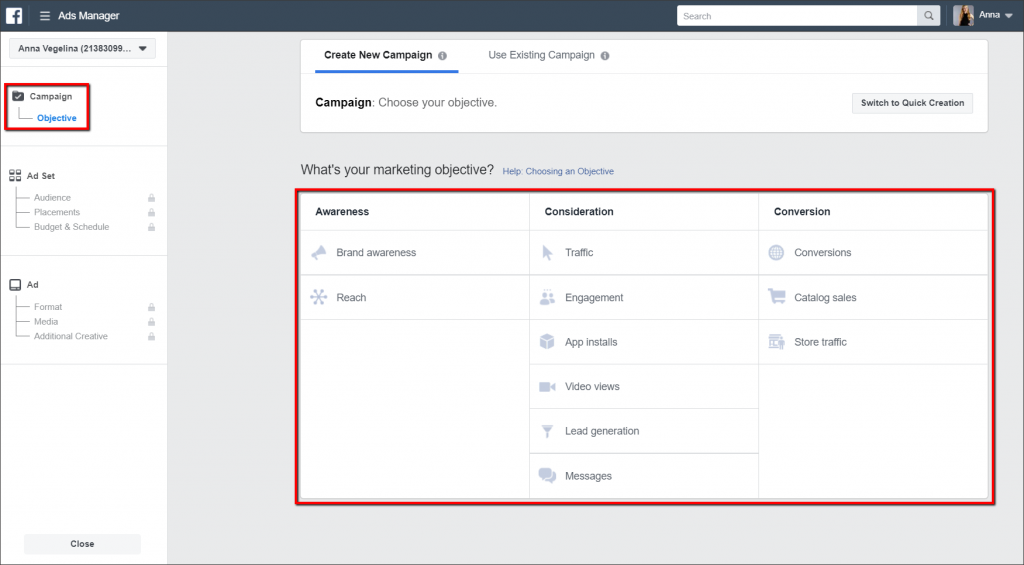
Let’s take a closer look at each of them – you should learn what objective suits your intentions best.

Awareness category
You need objectives from this category to increase people’s awareness about your brand. Usually, they are used by advertising companies with big budget and all.
________________________________________________________
Brand awareness objective – presents ads to form people’s awareness about your brand.
Reach objective – lets you choose how many times and how frequently users will see ads of your store.
Consideration category
Objectives of this category are aimed to involve users into some interactivity with your store.
________________________________________________________
Traffic objective – allows showing ads to those who are highly likely to click on the ad link
Engagement objective – allows to show ads to those who are highly likely to interact with them: like, comment and click on the links.
App Installs objective – allows showing ads to those who are highly likely to install an app (optional).
Video views objective – allows showing ads to those who are highly likely to watch your video
Lead generation objective – allows showing ads to those who are highly likely to click on it and, for example, leave their email.
Messages objective – allows showing ads to those who are highly likely to click on it, go to the messenger and send you a message.
Conversion category
Objectives of this category are aimed to spark sales from both new visitors and those who already know your store.
______________________________________________________________________
Conversions objective – allows showing ads to those who are highly likely to make a purchase or add items to cart.
Catalog Sales objective – allows us to upload a product catalog and show ads to users according to their actions on your site (viewing some product page, adding to cart, etc).
Store Visits objective – allows showing ads to those who are highly likely to visit your store offline (this objective is of no use for dropshipping stores).
Which objective to choose?
As you see, it depends on the result you want to get.
- If you want people to visit your site, choose Traffic objective.
- If you want to get more followers of your Business Page, choose Engagement and ‘Page Likes’ sub-objective.
- If you sell products on your site and actively advertise your products, choose the Catalogue Sales objective.
Let’s pick one of the most popular objectives – Traffic – for illustration.
Ticking off the box ‘Create split test’, you commence testing of ad groups. We don’t need this tick right now.
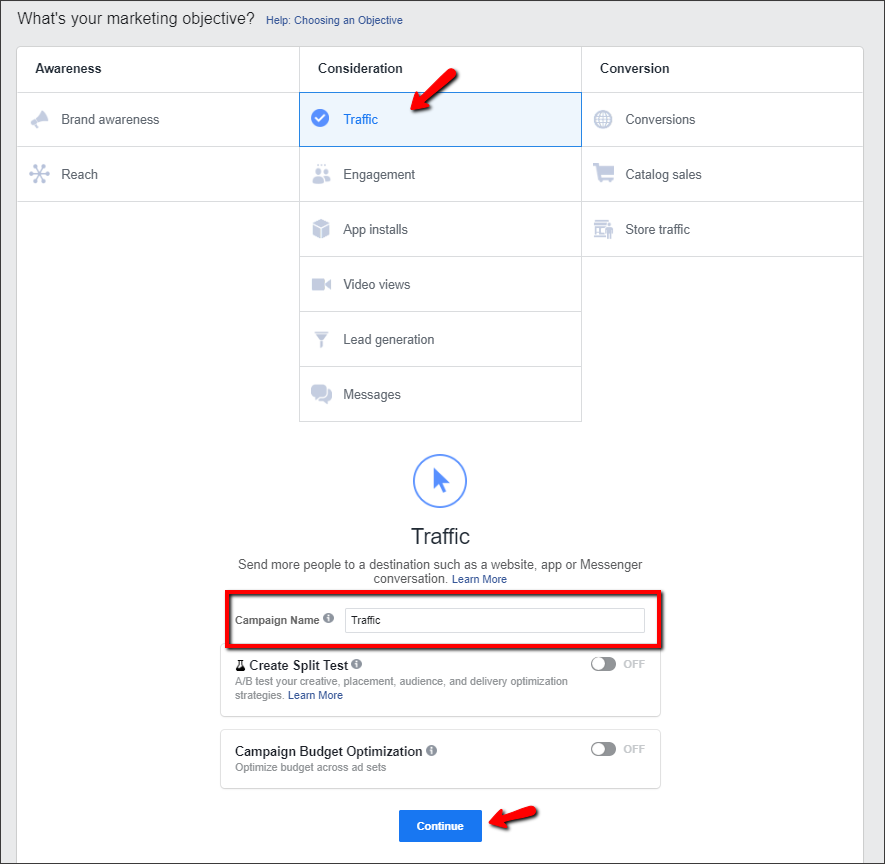
Then make up a Campaign name and click ‘Continue’.
Step 2. Edit your Ad account
If it’s your first time launching targeted ads, your account needs some editing. If you’re an experienced advertiser, miss this step.
- Choose your account country
- Choose account currency
- Choose time zone
NB: Choose the currency you’ll pay for your ads in. After your ad starts running, you won’t be able to change currency parameter.
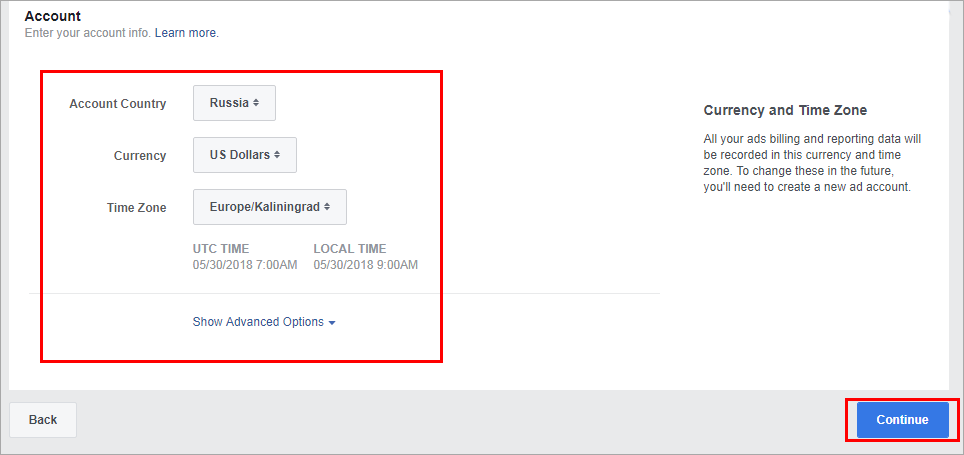
Click ‘Continue’.
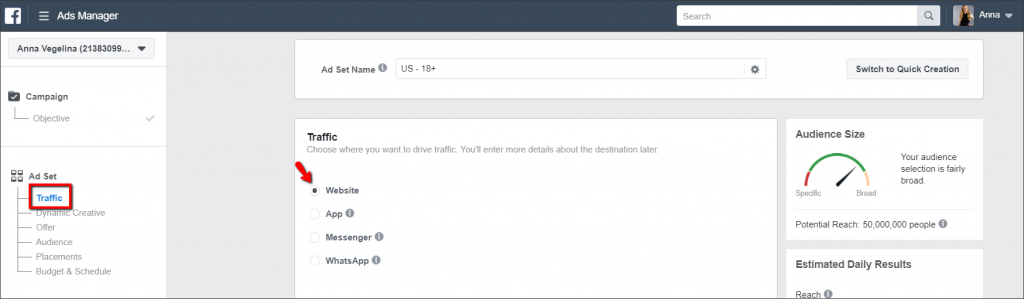
Step 3. Choose where the ad link will lead
These places can change depending on ads objective (traffic or conversions).
As we’ve chosen Traffic objective, there are 3 available places:
- Website
- App
- Messenger
Choose ‘Website’.
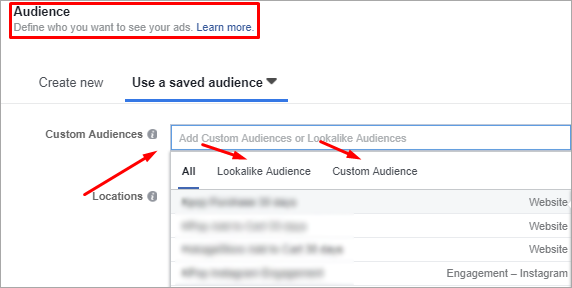
Step 4. Use targeting to choose audience your ads will be shown to
Targeting settings of Facebook ads let you show ads only to the audience you choose.
3 types of audiences for targeting:
- Custom audience
- Lookalike audience
- New audience
Let’s look more closely at each one.
- Custom audience is people who’ve already interacted with your store, for example:
- Visited your site
- Visited certain pages of your site
- Sent contact forms
- Made purchases from your site
- Interacted with your Business Page
A custom audience is also called a ‘warm’ one as these people already know your products, your store and believe you – especially if they bought something from you before and it was a good experience. As a result, they become your customers easier than any other audiences.
With a custom audience, you’ll be able to show ads to people who:
- Added products to cart but didn’t proceed to pay
- Visited your site
- Bought smth from you
- A lookalike audience is people who are similar to people from a custom audience by some features.
On Facebook, you can create a lookalike audience that is similar to:
- People who bought from your store
- People who visited your site
- People who gave you their phone, email
How does Facebook find lookalike audiences?
When you create a lookalike audience, Facebook analyzes parameters of an initial audience – age, gender, location, interests, behavior – and searches for people who have similar features.
However, you can set ads for these audiences only if you use Facebook Pixel. We explained where to find the Pixel set up guide above.
Where to choose lookalike and custom audiences?
The answer is the ‘Custom Audiences’ field.
As this article is supposed to explain how to launch ads from scratch, we’ll create a new audience for a better understanding of the audience creation process.
- New audience – people whom you choose using targeting options.
There are 2 steps to define such an audience:
- Basic targeting that includes:
- Locations – choose cities, countries or points on the map
- Age – choose any age from 13 to 65+
- Gender – choose men, women or both to show your ads to
- Language – choose your audience’s language
- Detailed targeting – one that allows showing ads according to person’s interests and behavior on Facebook and beyond. It consists of 3 categories with various subcategories.
- Demographics: Education, Financial, Life Events, Parents, Relationship, Work.
- Interests: Business & Industry, Entertainment, Family and Relationship, Fitness and Wellness, Food and Drink, Hobbies and Activities, Shopping and Fashion, Sports and Outdoors, Technology.
- Behaviors: Anniversary, Consumer Classification, Digital Activities, Expats, Mobile Device User, Mobile Device User/Device Use Time, More Categories, Multicultural Affinity, Politics (US), Purchase Behavior, Ramadan (Month), Soccer, Travel.
You can choose interests in 2 ways:
- By clicking ‘Browse’
- With the search box
Demographics, interests and behaviors sections display several basic interests. Use the search box to find even more interests.
What’s next?
Choose parameters of basic and detailed targeting in reliance on info about your target audience.
Let’s look at an example.
Our demo dropshipping store Cutekidscorner.com sells cute home decor items for kids’ rooms. How do we find potential customers on Facebook?
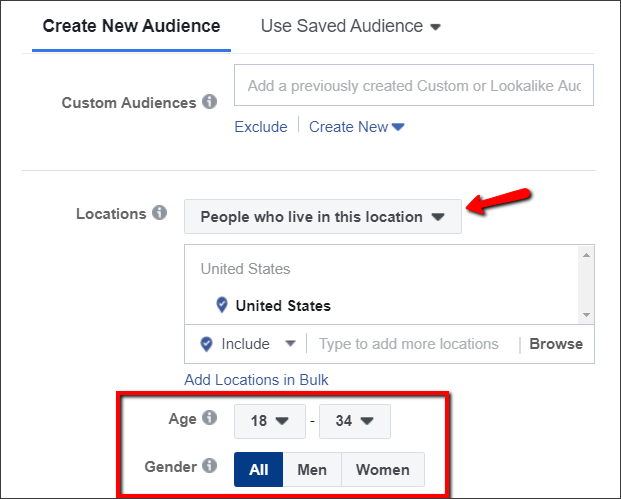
Let’s set basic targeting settings first.
- Country – United States
- Location – permanent residents
- Age – 18-34 y.o.
- Gender – Women and men (all)
- Languages – empty
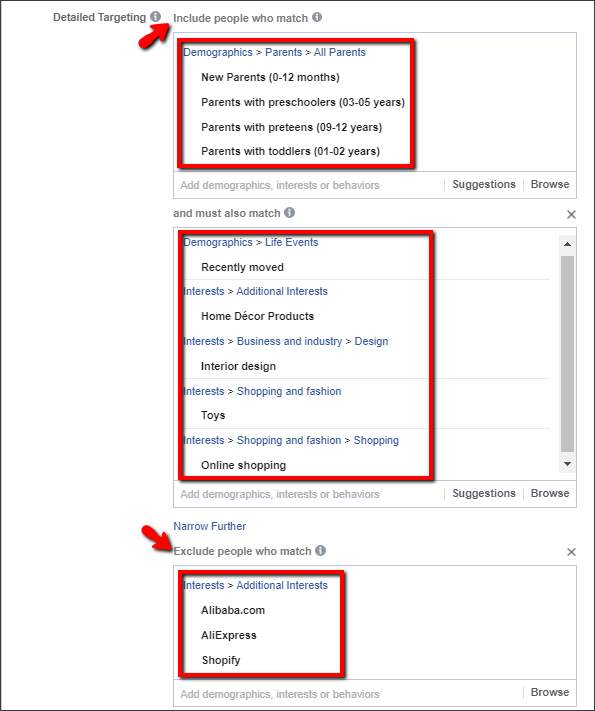
We need to decide on what are those people’s interests. Let’s say they are: Parents with kids (0 – 12 years) who prefer online shopping / recently moved / interested in toys, interior design, home decor products. We also should exclude those who know about AliExpress, Alibaba and Shopify platforms.
Read this article if you want to learn more about selecting the right audience for advertising.
NB: If a reach audience is too small, widen it with the tick ‘Expand interests’. Sometimes it helps us to get cheaper clicks/purchases. But it works not every time and needs additional testing. We usually don’t recommend using this option.

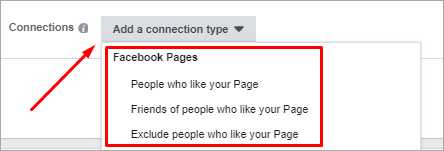
Option “Connections’ below allows you to add to or exclude from your audience those people who follow your page or use your app.
Our audience is ready! Try to make your own one following our example.
Now let’s choose our ad placement!
Step 5. Select placement for your Facebook ad.
Facebook provides automatic or manually chosen placements (places where your ads will be shown).
For our ad, we need the latter ones. So, click the ‘Edit Placements’ option in ‘Placements’ section and decide where you want to display your ad.
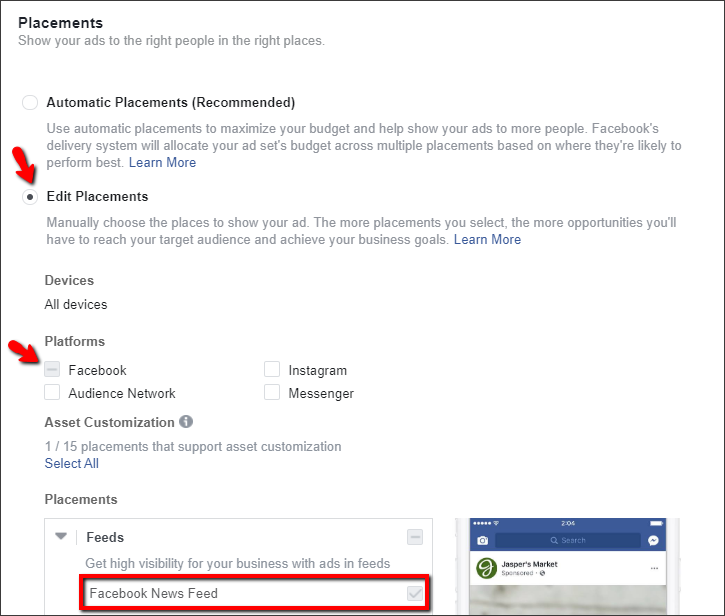
Facebook Ads Manager has 7 types of placements with categories inside.
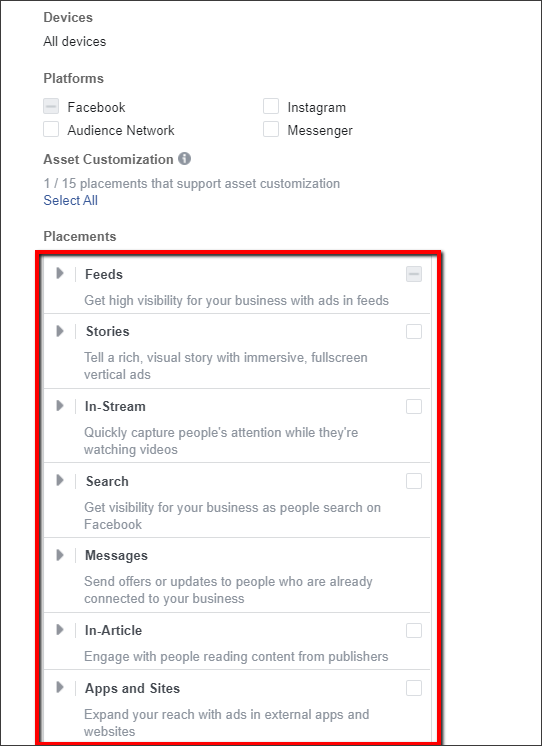
Depending on your objective choice in Step 1, some placements might be unavailable. As you’ll see in the screenshot above, it is so for ‘Traffic’ objective.
What to choose?
For the first advertisement, select several types of placements – feed, instant articles, right column – and see what works better for you. As for our advertising experience, we usually place our ads in the feed.
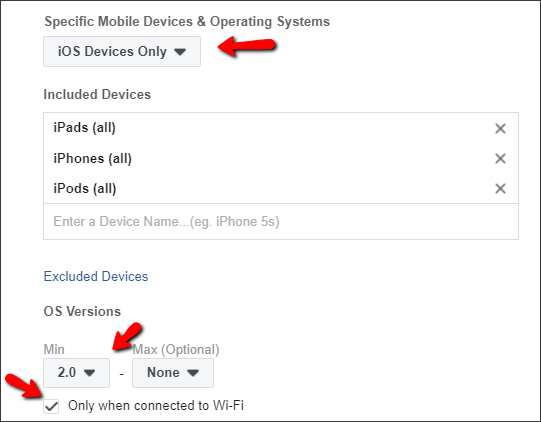
If you decided to display your ad on mobile devices, in the ‘Specific mobile devices & operating systems’ you can specify parameters:
- Operating system
- Connection type: mobile internet or Wi-Fi
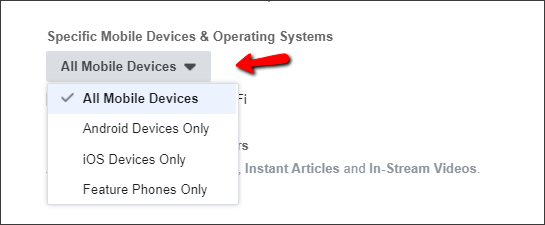
For instance, you are free to show ads only on iOS devices that are connected to Wi-Fi.
Step 6. Define a budget for your Facebook advertising campaign
A budget is a sum you are ready to spend on advertising.
There are 2 types of budgets:
- Daily budget
- Lifetime budget
Let’s find out what they look like.
- Daily budget is a sum you are ready to spend per day.
Set the period for advertising: start and end dates or only a start date (with continuous running of your ad afterward until you stop it).
So, if you set 10$ daily budget and 2 days of advertising, you spend $20.
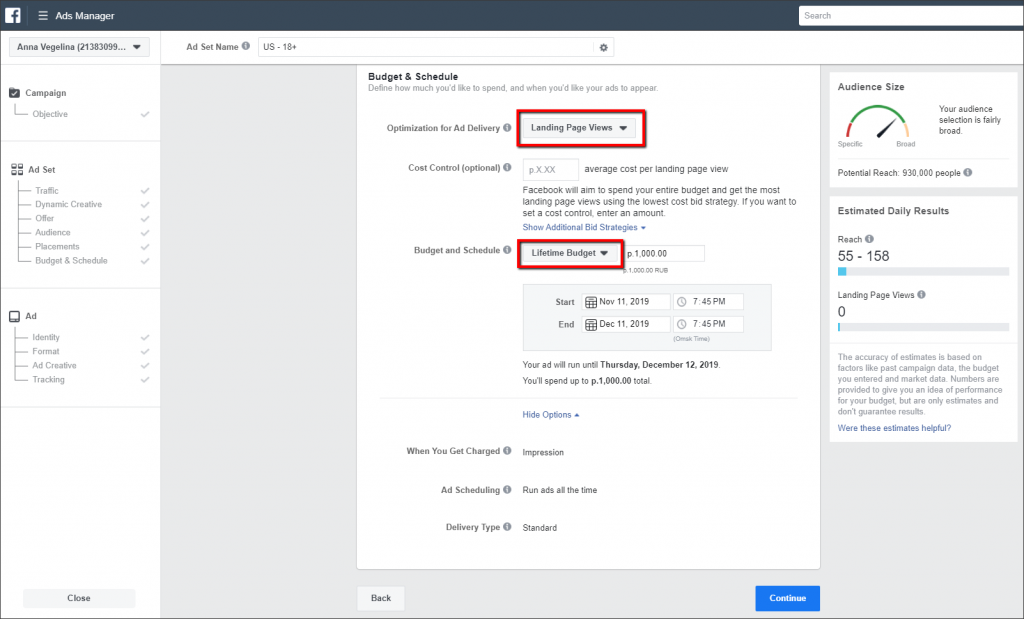
- Lifetime budget is a sum you are ready to spend for the whole chosen period in total.
It’s easy to set a lifetime budget: just choose a start date, an end date and a sum.
Facebook will spend almost equal portions every day: today it will spend a bit more, on another day – a bit less.
What peculiarities does lifetime budget have?
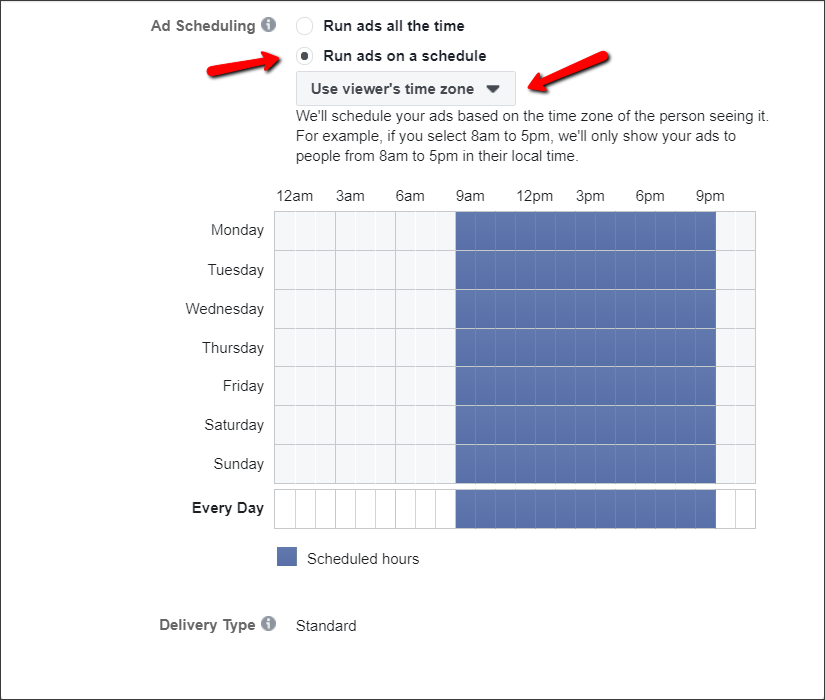
Well, with a lifetime budget you can choose a schedule of advertising:
- Days of week
- Time of day
- Time zone
For example, you can set your ads to be shown on workdays from 8 am to 8 pm.
The bigger the budget you have the more clicks and reach your ad gets.
How much should you spend on Instagram ads?
Well, it depends on your budget, your store niche, advertising objective, etc.
For example, if you sell premium quality products and have $100 average check, it is unlikely that you’ll get great results with a $10 budget – it’s simply not enough.
However, if your store average check is $20, safely start with $10-15 budget.
Setting up a budget, Facebook will show you an approximate reach volume and number of clicks for Traffic objective (or impressions, unique reaches or page views – it depends on what objective you choose).
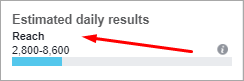
We advise you to test your ad with a $10 daily budget during 2-3 days.
Step 7. Choose ad delivery optimization
This section contains more detailed settings for targeted ads that depend on the chosen objective (Traffic, Engagement, Conversions, etc).
If your objective is traffic, there are 4 choices available:
- Landing page views
- Ad link clicks
- Impressions
- Daily unique reach
Let’s look at them more closely.
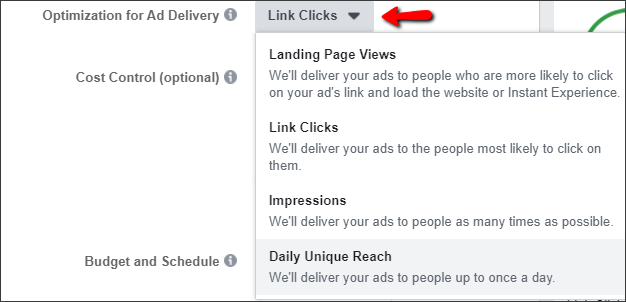
- Landing page views
Not all the people who clicked on your ad will get to your site. Ohhh. But why?
Well, there are several reasons: a user clicked on your ad accidentally, he/she has a slow internet connection, your site uploads too slowly, etc. But with the ‘Landing page views’ feature, Facebook will show your ad only to those who are very likely to click on it and wait until your site is fully uploaded.
- Link clicks
If you choose this optimization, Instagram will show your ad to people who are very likely to click on the link.
- Impressions
If you choose this option, your ad will be shown as many times as possible. Some of your member audience will see it several times a day.
- Daily unique reach
With this feature, Instagram will show your ad to unique users only once a day.
These optimization options are great! But which one to choose?
We believe that ‘Link Clicks’ and ‘Landing Page Views’ work best of all. For our ad, we’re gonna choose ‘Landing Page Views’.
Step 8. Decide on a bid strategy and price
What makes an ad click cost?
To answer this question, let’s examine how Facebook auction works first.
As you know, Facebook makes money on ads – that’s why it wants users to drop by as often as possible. The more a user looks through the feed, the more ads he/she sees – and the more money Facebook gets.
Nevertheless, Facebook knows that tons of dull ads may irritate people and they might stop using this social network. This is the reason why an auction winner is not the one who pays more but the one whose ads are of more relevance for users.
What factors are considered in an auction?
It is a combination of 3 main factors:
- Bid Cost
Or how many you’re ready to pay for an ad link click in comparison with other advertisers. Facebook Takes into account your target audience settings (gender, age, location, interests, etc)
- Ad quality and relevance
After the ad launch, Facebook collects statistic data on your ad results: how many people saw it, clicked, hid it, etc. Once your ad collects 500 impressions, it gets a relevance rate mark – from 1 to 10. The higher a mark is, the more relevant your ad is for the audience.
- Estimated action rates
These rates reflect what is the possibility that a user will take this or that action (link click, purchase, registration, etc).
During the auction, Facebook considers these parameters, and an ad with the highest total value wins.
How does it work in practice?
Let’s say we set up our ad for young women interested in cute stuff; we’ve chosen gender, age, location, and other targeting settings.
Facebook decides on the minimum bid rate for this audience and keeps an eye on their reaction to the ad. And estimates ad relevance:
- If the audience takes a certain action (click, like, etc), Facebook decreases click cost.
- If the audience doesn’t interact enough with your ad or even hides it, the click cost will significantly increase or ad might even stop running.
But enough of theory, let’s move on to set a bid strategy at last!
Select the type of your bid strategy:
Automatic: Facebook sets bid cost for you
Manual: You set on bid cost yourself
Basing on our experience, we state that automatic bidding works better than manual one in 99.99% of the cases. And the click cost is lower!
If you’ve selected ‘Link Clicks’ optimization, you will be offered to select charge options:
- Charge for impression
- Charge for a click

Note that if you’ve selected ‘Landing Page View’ optimization, you will be charged only for impressions.
Which charge option is better?
Well, as you’re probably a newbie, it’s better to be charged for impressions. Later, after some experience with ads, try to experiment and choose to be charged for clicks.
Step 9. Create an advertisement
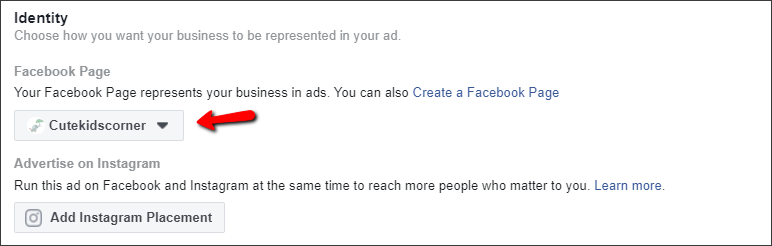
- 1. Make up an ad title and decide on the page you’ll launch your ad from.
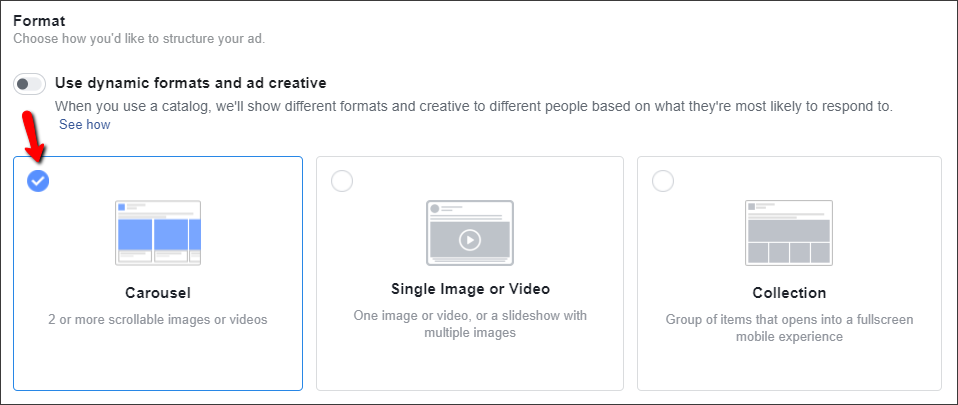
- Select an ad format
For ‘Traffic’ objective, there are 3 ad formats available:
- Carousel
- Single Image or Video
- Collection
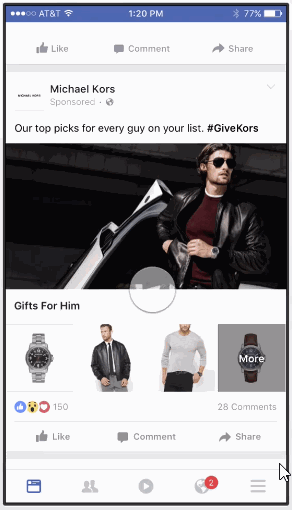
- Carousel
This format allows placing from 2 to 10 pics or videos (or both formats) in one ad. Each pic or video will be entitled and will have a button.
Carousel lets you present the range of products in your store, benefits of one product, in particular, tell the story, etc. There is a great field for your imagination.
This is an example of a carousel:
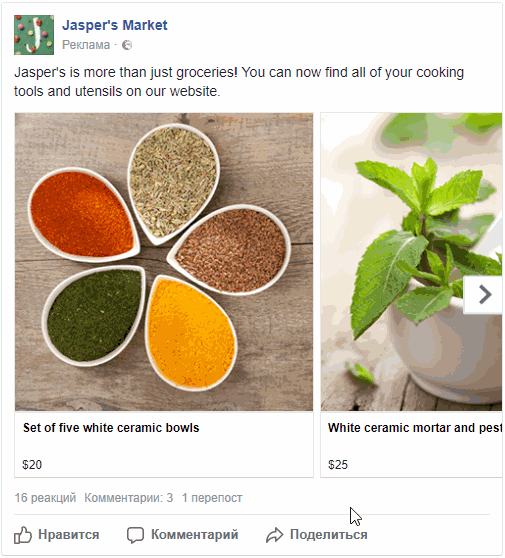
Recommendations on image parameters:
- Image size: 1080×1080 px
- Aspect ratio: 1:1
- Text: 90 characters
- Title:40 characters
- Single image or video
It is the simplest and most popular ad format that allows creating single-image ads.
Recommendations on image parameters:
- Image size: 1200×628 px
- Aspect ratio: 1.9:1
A single video ad is one of the most effective ad formats on Instagram: with a video, you can easily express an idea, show your product and tell about a problem and its solution.
Here is an example of a single video ad:
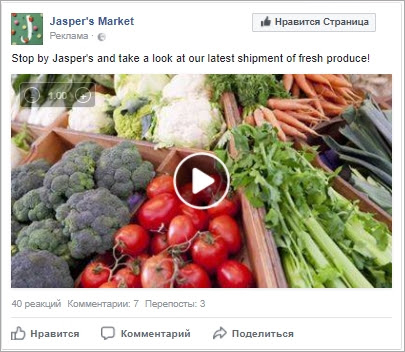
Recommendations on video parameters:
- Aspect ratio: from 16:9 (landscape) to 9:16 (portrait)
- Resolution: min 700 px
- File size: 4Gb max
- Video compression standard: H.264
- Format: MP4 or MOV
- Audio: AAC, 128 kb
3. Collection
With the collection format, you are able to show compilations of your products that open the full screen.
An example:
Recommendations on collection image parameters:
- Image size: 1200×628 px
- Aspect ratio: 1.9:1
We want the ‘Carousel’ format for our ad.
- Create an advertising message
Carousel ad includes several important elements. Let’s start with 2 of them:
- Text
- Pictures (we’ve picked 1 product to advertise, but we’ll have 4 pics with the product variations)
What should such pictures look like?
They should be noticeable and appealing, and – in a perfect world – express your ad idea.
If you want to place some text over the picture, it has to occupy no more than 20% of the picture size. Otherwise, your ad deliverability will be low. Use this tool to check your advertising pictures.
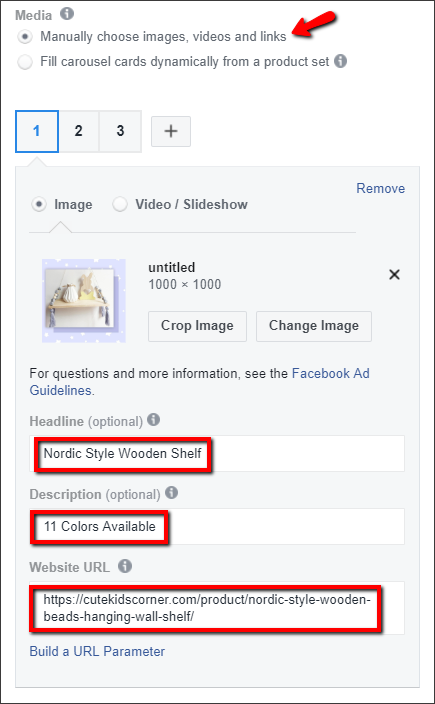
After that you’ll need to set:
- Headline for each product
- Destination URL for each product
- ‘See more’ URL that leads to the whole product category
What to mention in the ad text?
One of the popular text templates is Problem/Solution/Call To Action.
So, make several questions that express your audience’s probable problems and then suggest a solution – your products!
In addition, tell people about your special offers like free worldwide delivery or free returns. Create a sense of urgency telling them that your offer is limited and they need to hurry.
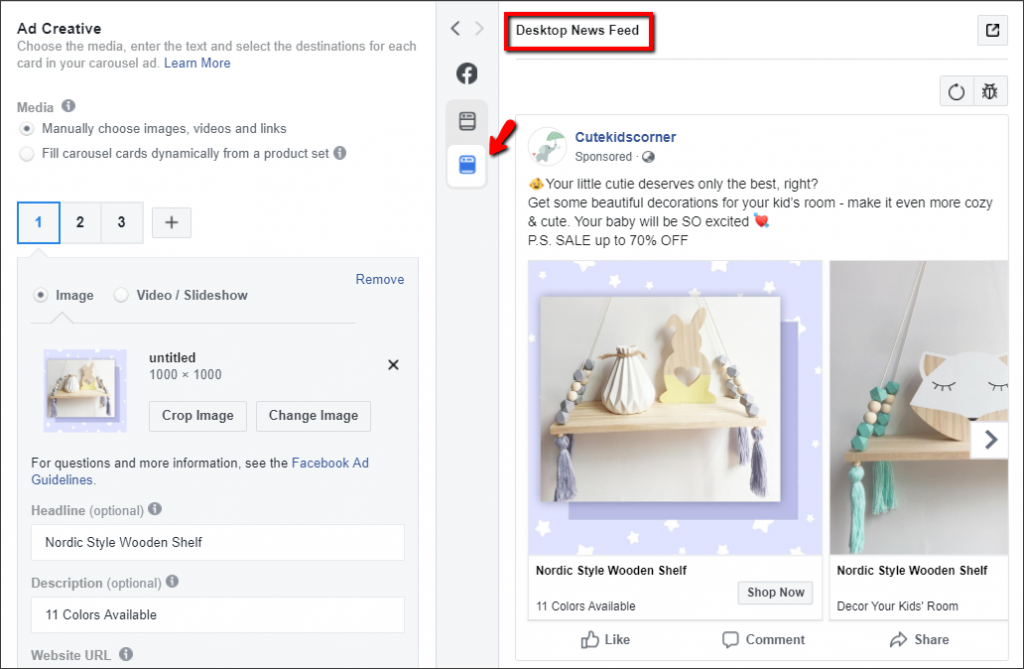
For instance: “ Your little cutie deserves only the best, right?
Get some beautiful decorations for your kid’s room – make it even more cozy & cute. Your baby will be SO excited 
P.S. SALE up to 70% OFF”
- Call to action
Add a call to action that suits your ad best. We’ve chosen ‘Shop Now’.
NB: Button text must relate to your advertising message.

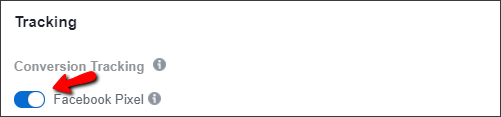
- Conversion tracking
If your conversion pixel is already set up, you can turn it on right here. It will send data to Facebook each time a user takes actions chosen by you (sending of a contact form, purchasing, etc).
We are done with main ad settings! On the right, you can see what your cool ad looks like from different devices.
Click the ‘Confirm’ button.
A message will appear saying that your ad is sent to moderation that lasts from 15 minutes to 4 hours – but usually, it doesn’t take long.
Congratulations! You managed to set and launch a Facebook ad via Ads manager! Yay!
It may seem that to create Facebook ads is hard. But it was only your first time, right? In the beginning, it can take up to 30-40 minutes, but the more advertising experience you get(!), the faster you make ads. If you want to learn more about Facebook tricks, visit the Case Studies section. If you want to get ready professional ads from the experts, visit our Services section and choose a suitable plan.