Step 10. Create Google AdWords account and launch Google Shopping campaigns
Do you want to have an access to unlimited possibilities of Google Services? Thanks to them you can organize your work, analyze the effectiveness of all the avenues of promotion, collect all of your data, look for trends and, of course, use their promotion methods, etc.
Essential Google Accounts Set Up
First of all, we advise you to create accounts in Gmail, Google Analytics, and Google Ads. So, let’s start with Gmail Account. Go to gmail.com and click “Create account”. After that, you will have an easy access to all Google products and services which will be really helpful for your dropshipping business and daily activities.
If you already have a Gmail account, go to adwords.com, start your registration in the Google Ads account where you will be able to create and optimize all of your future ads. You can click either “Start now” or “Sign in”.
Then you will see the page where you will need to confirm some of the details such as your email (use your Gmail), country, time zone and currency. It’s very important to provide correct information because there’s no way for you to change this afterward. Check everything twice before submitting it. That’s easy but you should be very careful. There won’t be any problems with creating Google Analytics account if you already have your website and Gmail.
With Google Ads, you can create different types of campaigns depending on your targeting audiences and advertising goals. Each advertising network has different types of campaigns to suit your goals. The campaign type determines where your potential customers will see your ads, but you can make this more specific by implementing your targeting settings.
There are 5 types of campaigns in Google Ads:
- Search Network,
- Display Network,
- Shopping,
- Video,
- Universal App.
This article goes through Shopping campaign type. Comparing to some other revenues of promotion, this type has a lot of advantages which we usually use for our dropshipping stores. They are:
- High conversion rate,
- Easy targeting options,
- Control of your product information,
- Low competition & cost,
- Testing without losing money.
To make Google Shopping Ads work for you, you need to set up one more account: Google Merchant Center. To sell your products on Google Shopping, you’ll need to upload your products into Google Merchant Center Feed and create a Shopping campaign in Google Ads.
What is Google Merchant Center? It is a tool that helps you upload your store and product data to Google and make it available for Shopping ads and other Google services. Google Merchant Center is where your product feed lives.
What is Google Shopping? Previously, it was called Google Product Search, Google Products, and Froogle. It is a Google service invented by Craig Nevill-Manning which allows users to search for products on online shopping websites and compare prices between different vendors. Google Shopping is powered by two platforms: Ads and Google Merchant Center.
Shopping ads allow shoppers to quickly and easily find your products on Google. If you sell products online, you should know that Google shopping has the potential to generate massive sales for you. Almost 50% of our sales in the e-commerce department for the last quarter have been gained thanks to Google Shopping.
Our next step in this article will be to create a Merchant Center Account. It’s important to follow all the rules and requirements because violating them means never getting to serve a single Shopping ad. But you can easily do it all fine, don’t worry 🙂
Step 1. Create a Google Merchant Center account
To sell your products on Google, you’ll need to upload your products into Google Merchant Center and create a Shopping campaign in Google Ads.
Even if you’re pretty hyped up for starting your Google Shopping ads, don’t rush! All settings take some time and accuracy.
First of all, you need to create a Google Merchant Center Account and put all the details about your online store. Please, follow these simple instructions. You should be already logged in your Google Account which you use to look at the Google Analytics of your website. You need to set up everything only once so, draw a deep breath and open Google Merchant Center.
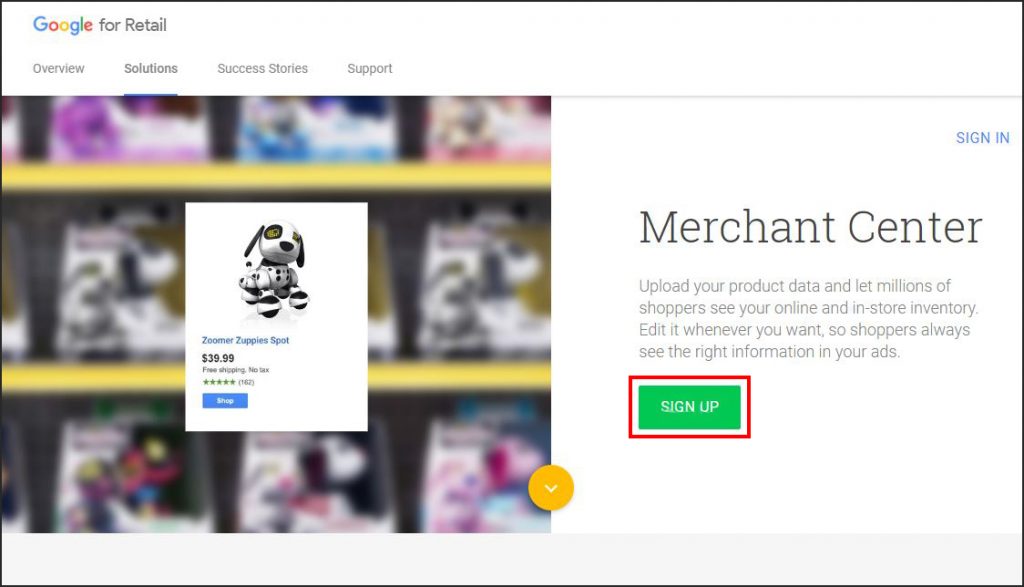
When you get to Google Merchant Center, you will see some information about it. Look it through if you want to learn more, FYI – success stories are quite inspirational. Click “Sign up” tab.
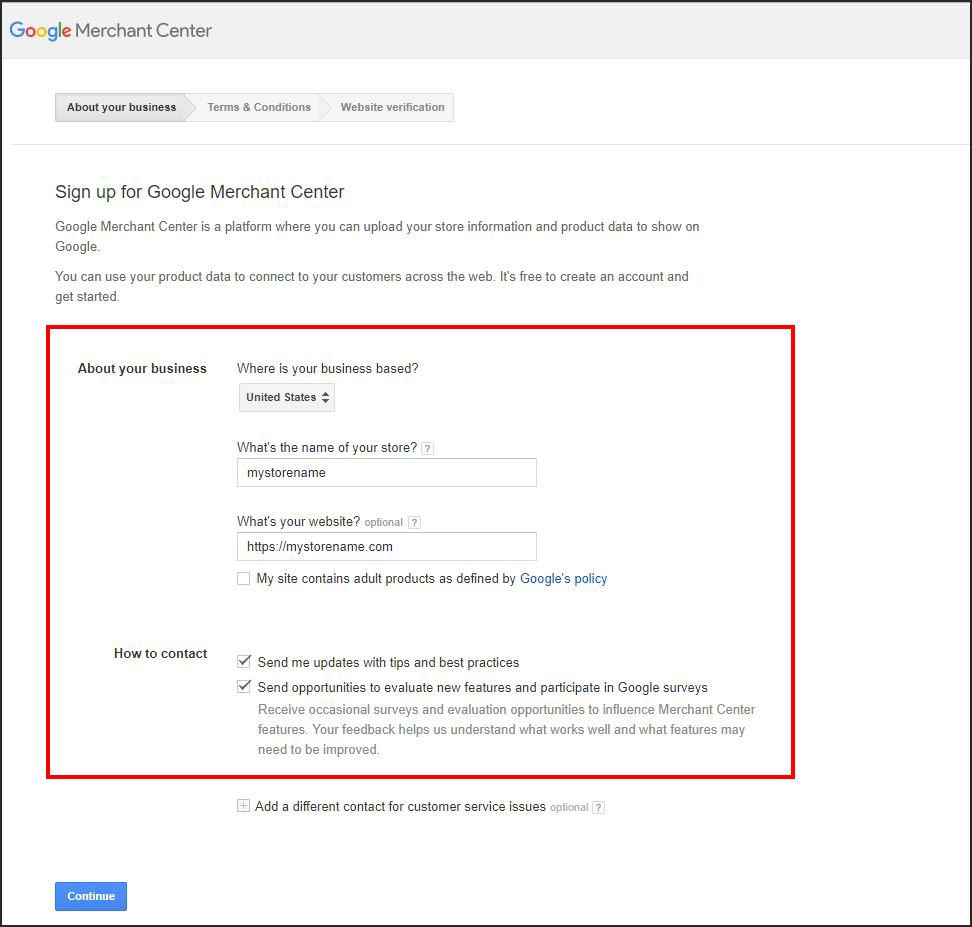
- First up, fill out the information about your store. You need to put the country where your business is based, the name of your store and the link to it.
- Your store name will be displayed next to your products on Google, so make sure it matches the name of your store.
- URL must start with a scheme, don’t forget to include the prefix.
- Leave the ticks in the boxes to get tips from Google – actually, some of them are really helpful.
- When all the fields are filled, press “Continue”.
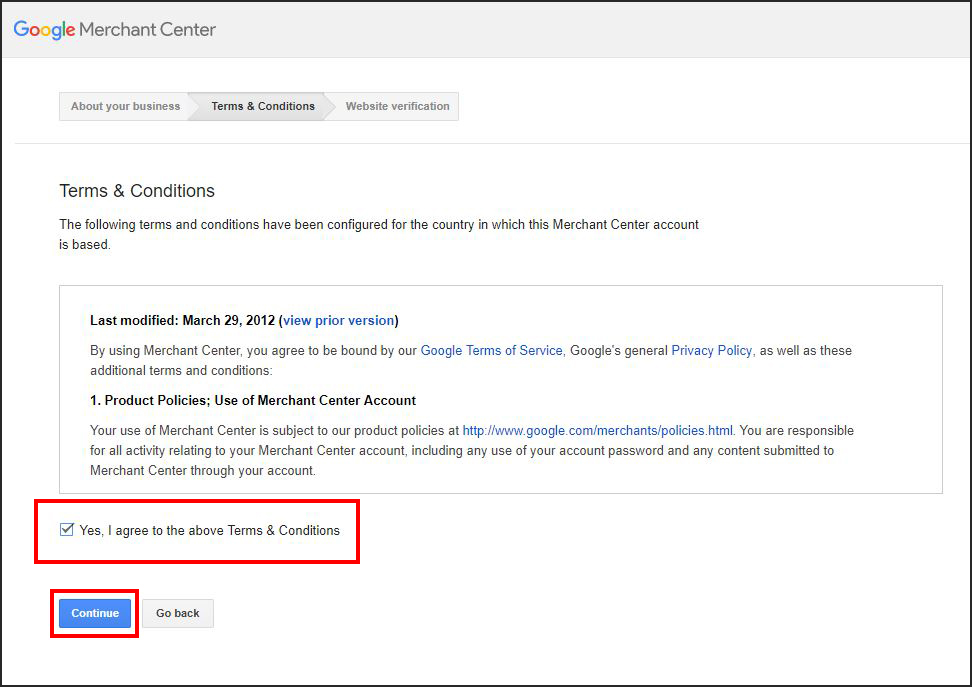
On the next page, you can look through Google Terms & Conditions. Tick the box to agree with them. Then press “Continue”.
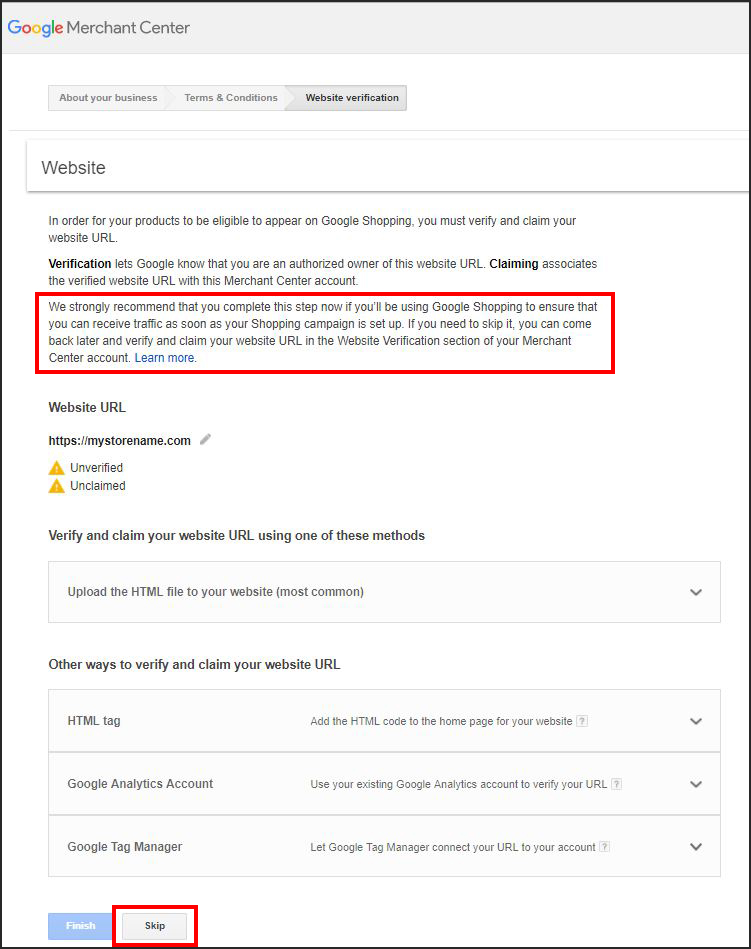
You can skip website verification right now, we will do it in the Website Verification section of your Merchant Center account which will open right after you click “Skip”.
Step 2. Verify and claim your website in Google Merchant Center
Here you are – in the Google Merchant Center which is the first stop on our way to great and easy sales with Google Shopping ads.
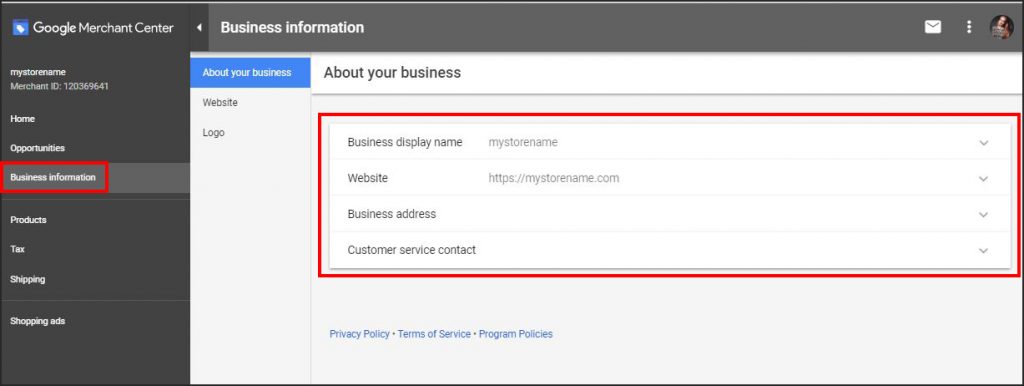
Now, you need to verify and claim your website. From your dashboard, click “Business information” >> “Website”.
There are a few ways for completing your verification:
- HTML file upload,
- HTML tag,
- Google Analytics,
- Google Tag Manager.
We are going to use Google Analytics, it’s one of the easiest ways. If you would love to try other options, look for detailed instructions in Merchant Help Center.
Select “Google Analytics” and press “Verify & Claim”.
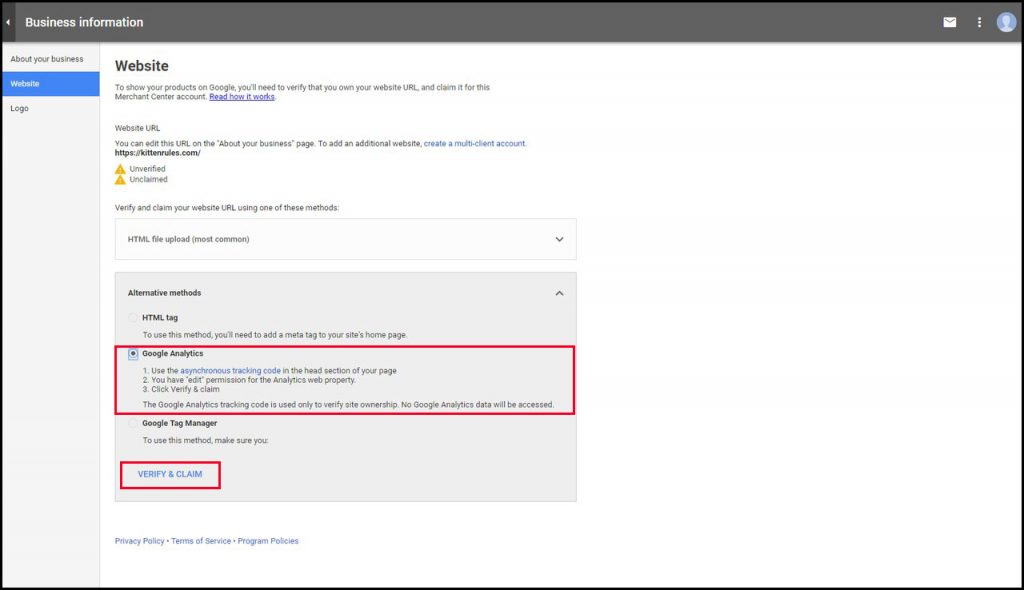
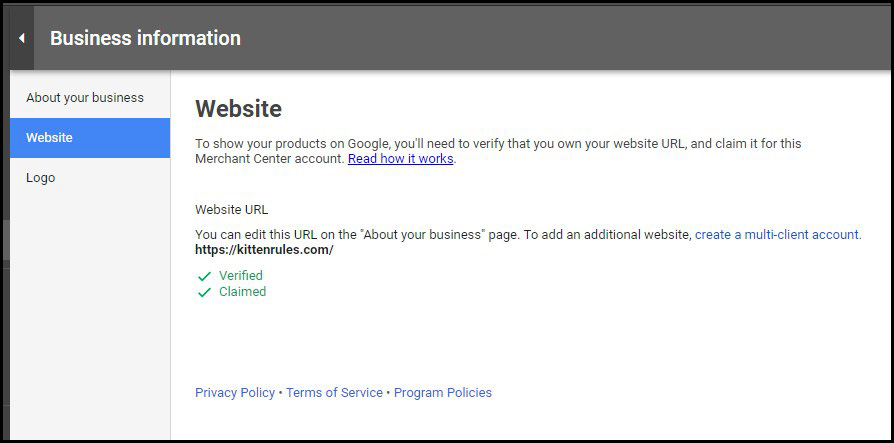
Hooray! After this action, your website will be verified and claimed by Google Merchant Center.
You can also upload your logo in PNG or SVG formats for use in Google Shopping. You will see all the image requirements in the “Logo / Branding” section. The logo you upload will be used for advertising your products on Google, and it will be viewed by the users of different devices that have screens of various sizes and resolutions.
Step 3. Meet Merchant Center Guidelines
Now, when you have verified and claimed your website URL, you need to make sure that your website is compliant with these rules before you can serve shopping ads:
- You must have secure checkout (“https” in the address bar while someone is getting ready to give you their payment info).
- People must be able to access your shopping cart from anywhere in the world. Even if you only sell products in the U.S. or Canada, people in Denmark have to be able to reach your checkout. Don’t worry, you can still decline their payment method.
- Your website and product data both have to be in the official language of the country for which you’re serving ads.
- You need accurate contact information as well as the instructions on how billing and returns work with your business.
Step 4. Set up tax & shipping
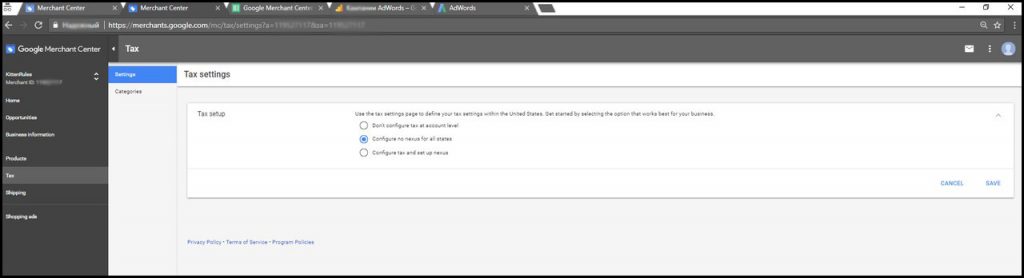
So that users understand the exact price of the product they see in Google Shopping, you may need to submit the taxes that you collect. Because tax can be a complex subject, you have several different options for submitting tax. To make these changes you need to go to the “Tax” section in Google Merchant Center.
As we don’t add taxes to our products, we select “Configure no nexus for all states” and go to the next section called “Shipping”.
In the “Shipping” section you need to show information about how much you charge for shipping. Your shipping settings are used across Google programs, including Shopping ads and Purchases on Google. Shipping cost is the most common reason for users to abandon their shopping choices, so setting up your shipping settings to display accurate information can help the successful performance of your ads. For drop shipping store owners, it’s common to provide free worldwide shipping. If you have some different shipping policy, you can look through Google shopping guide about shipping.
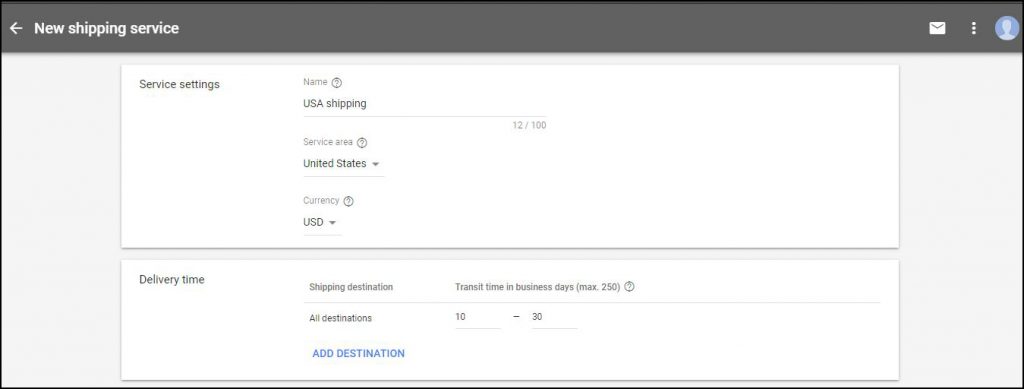
So, we start with adding the information about our shipping service. Press this blue round button.
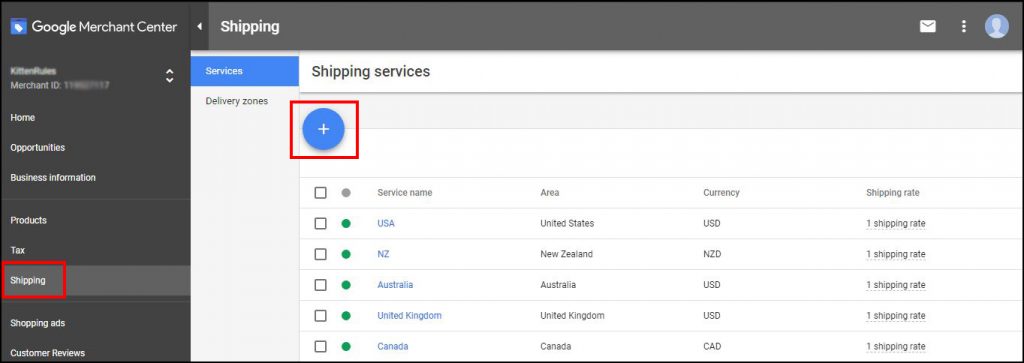
You need to create shipping settings for each country you are going to target. Note: if your drop shipping store language is English, you can target countries the official language of which is English. So, we create 5 shipping services for USA, New Zealand, Australia, United Kingdom and Canada. Just set your target country, currency, transit time in business days (put the same number you have in your webstore), shipping rates (if you have free shipping – put $0) and other information about shipping service and click “Save”. Check the picture below.
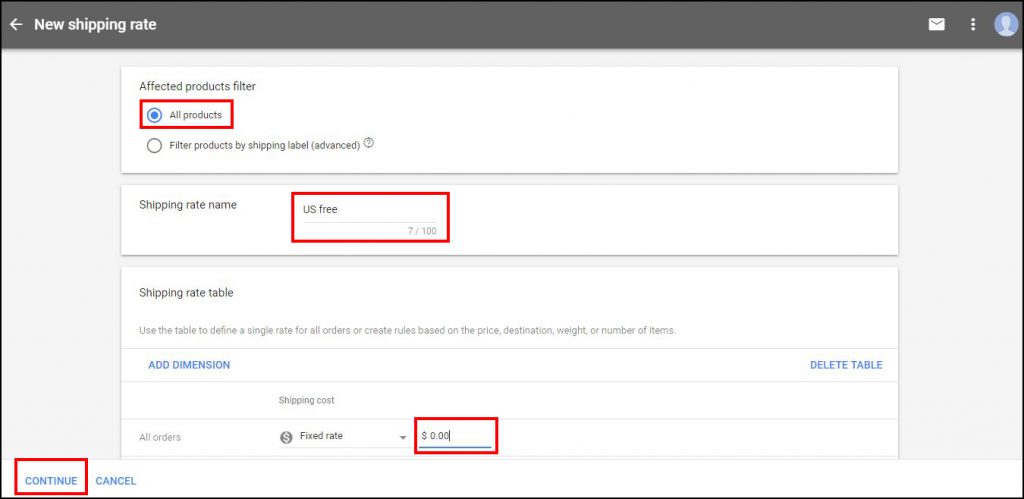
Then click the blue button under the shipping rates. Name it and click “Create a single rate for all orders”. Put zero if you provide free shipping to this target country and press “Continue”.
Well, the first part of our article is just a piece of cake comparing to the second one! However, cheer up! You need to set up most of it just once.
Step 5. Prepare Your Product Feed
One of the most time-consuming parts in Google Shopping is Google Shopping feed creation. Right now we will show you how to do it with your own hands.
Actually, at the very beginning, we didn’t have any tool to save our time on adding products to the feed, such as Google Merchant add-on. Since our developers made it, we no longer do this job manually and save a lot of time and nerves.
However, we decided to show you all the steps and give as much knowledge as we can. If you have already bought our add-on, move to the “Last preparations” part in this article.
- Set up Google Shopping Feed
To create your feed, you should go to “Products” >> “Feeds” from the page menu. Click the plus button to get started. Provide the requested information in the “Register a new feed” section to continue. Your basic information includes a target country and a language of your Google Shopping feed.
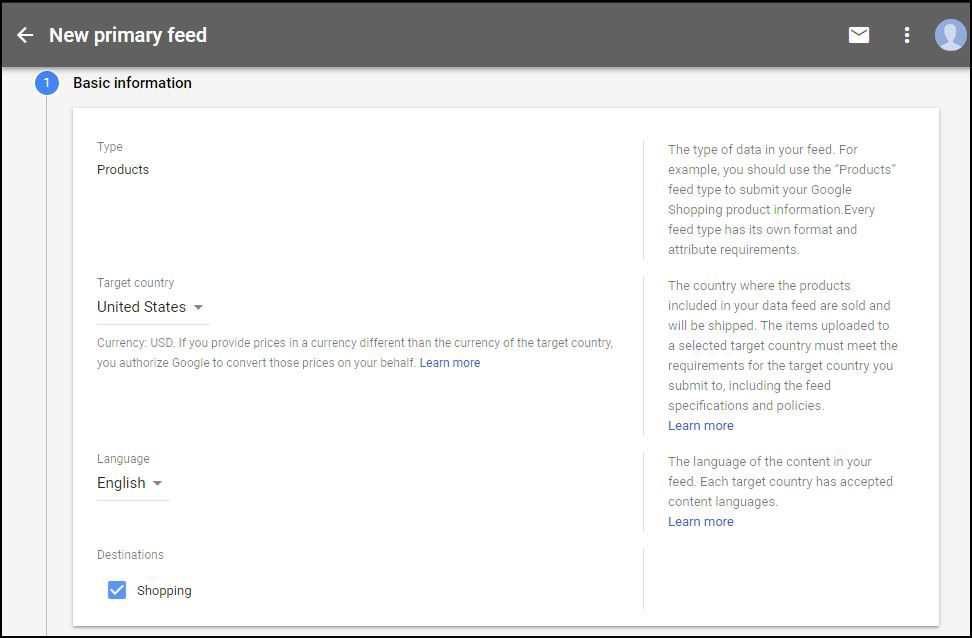
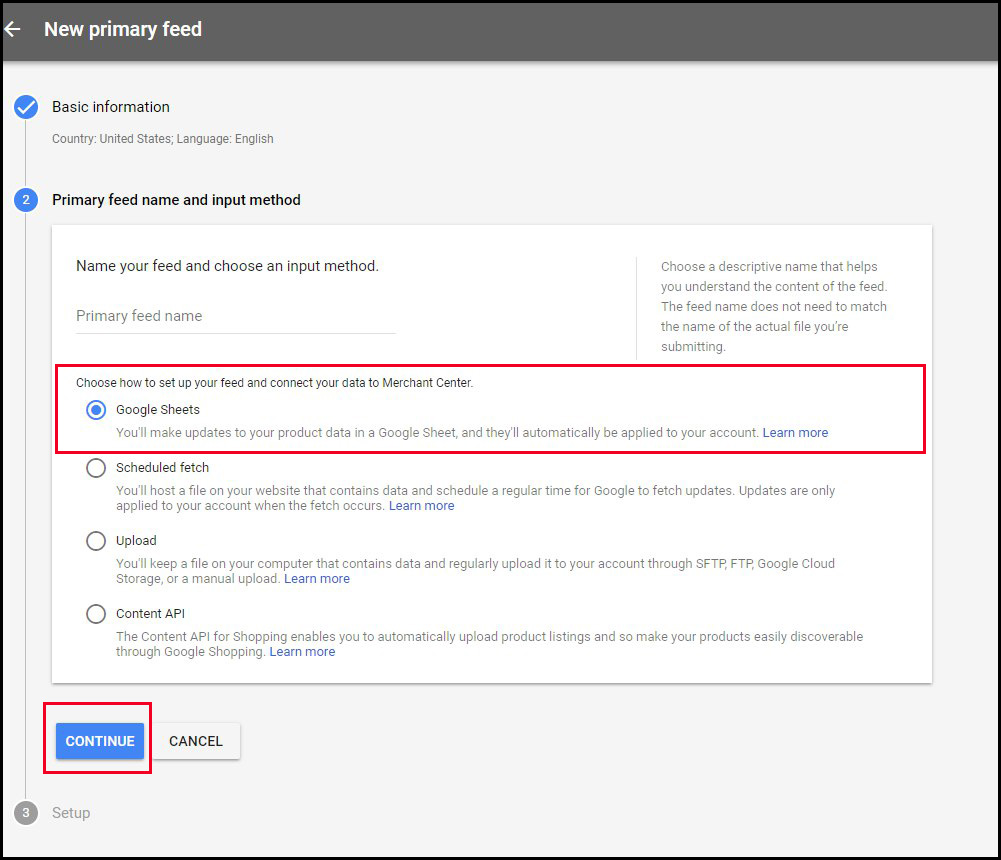
Give the name to your primary feed and choose an input method. The feed name doesn’t need to match the name of the actual file you’re submitting. If you are going to type all your products manually, you should select “Google Sheets” and then press “Continue”. Other options are more advanced, but it’s useful if you have a high number of products or our add-on.
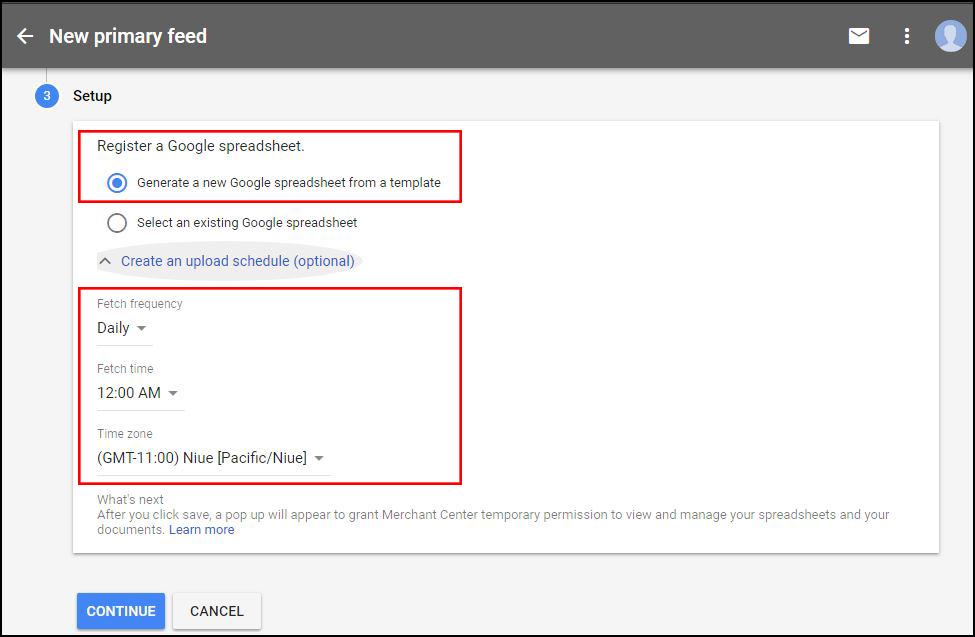
At the third step, you get the option of whether you want the Merchant Center to hook you up with a product template or select an existing Google sheet. You can also choose to create an upload schedule so that your product data can be automatically refreshed. We advise you to leave a daily update frequency.
After you press “Continue”, you see a cool Google sheet with 3 sheets including template, examples, and instructions. The sheet with the template has columns for all the obligatory product data fields.
This is actually the heart of your product feed, which you need to create using all the strict guidelines. Google uses your product feed to match your ads to people’s search queries.
- Google Shopping feed creation
Right now you can open the Ultimate Google Shopping Guide Appendix specifically created for you by our team. This resource has all the necessary tips which you will need during the feed creation.
Your feed should meet all the Google requirements which depend on the type of the products in your store. There are a few universal items that Google requires for every feed, and they are listed in the names of your columns:
- ID – a unique identifier for all of your products, it should be unique for each product in your feed.
- Title – your product’s name which should be no more than 150 characters and include keywords of this particular product.
- Description – a description of your product with its specifications.
- Link – the link to your product.
- Condition – whether your product is new, used, or refurbished.
- Price – it should be the currency of your target country.
- Availability – whether your product is in stock, out of stock, or on pre-order.
- Image link – a link to an image of the product in your website.
- GTIN – your product’s Global Trade Item Number – can be left empty.
- MPN – your product’s Manufacturer Part Number can be found in the Product Options >> Supplier >> Product ID.
- Brand – put your company name here.
- Google Product Category – includes either the full path of the category or the numerical category ID (“taxonomy with ids” page).
- Gender – your product’s targeted gender: male, female or unisex.
- Age Group – your product’s targeted demographic: newborn, infant, toddler, kids, adult.
- Size – required for all apparel items in the Apparel & Accessories > Clothing and Apparel & Accessories > Shoes.
- Color – your product color(s).
- Material – your product material(s).
- Item Group – ID for a group of products that come in different variations (types).
- Google Shopping feed template
In the Ultimate Google Shopping Guide Appendix, you will find an example of product feed (see the tabs).
Now that you know the things that are going to be required in your product feed, you need to ensure that your product data has a way of making it to your Ads account.
- Feed Rules Options
Google Merchant Center also gives you an extra option to help speed up your way to a complete, accurate product feed: feed rules. To get to these, go to the products menu, select feeds, click on an active feed, and then go to Rules. You can set up your rules depending on what has been changed in your products information or on what you need to renew.
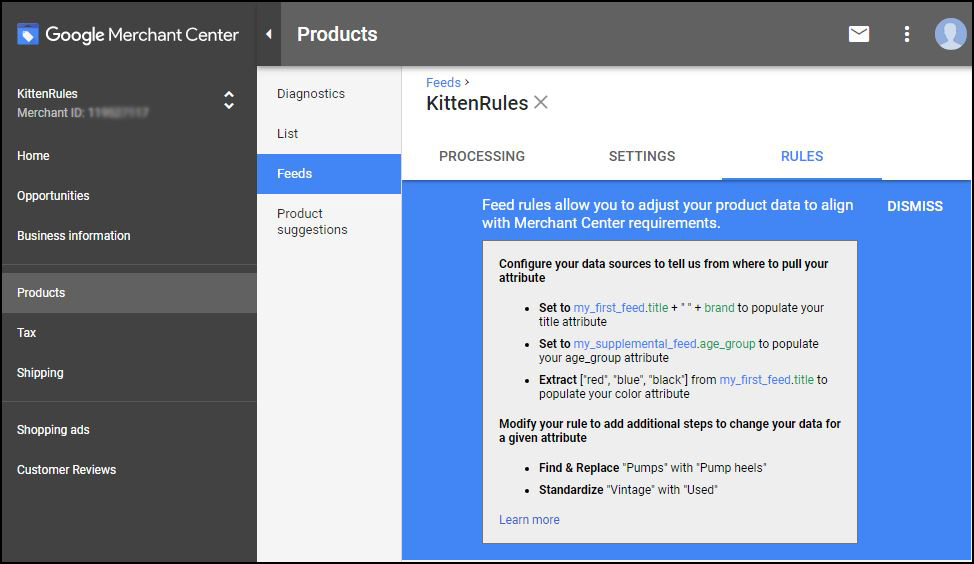
You will be able to use Feed Rules to:
- Add missing data requirements.
- Create custom data columns for more granular campaign segmentation.
- Assign common products together based on an existing attribute in your feed.
- Populate the promotion ID field with a static value.
We actually don’t use them, but that’s a great and really useful feature from Google Merchant Center.
We just want to remind you that AliDropship have a new add-on which saves a huge amount of your time and works great with automatic feed generation using your website microdata.1
- Last preparations
Well, before starting your ads in Google Shopping, you need to brush up your dropshipping store. Check whether your product pages are perfect. You need to prepare them for your ads whatever placement you choose. Keep it in mind all the time.
Here are some extra tips from us.
The product name should be readable and short without any strange words you might see on AliExpress. Use the Google Keyword Planner to put searchable keywords in the product name. And, please, notice that “Titles” in your product feed is the heart of Google Shopping feed which can effect on your CPC and sales. That is important for your SEO optimization as well.
Permalink should be identical to the product title; please don’t leave the original AliExpress one. Your permalink will be generated automatically when you delete the previous one and put the tick while editing your products.
Be careful and inventive with your description. It’s better when you keep the same writing style on all of the single product pages. It makes your website look more professional and catchy. And, of course, check for the grammar/spelling mistakes!
If you need to put any dimensions, use the type of metric system that your potential clients use. For example, we try to put both centimeters and inches, US and EU feet sizes, etc. in all of our size charts or bullet points.
In the SEO section, delete everything, then click “save changes” to make your SEO close to perfection. Of course, you can put extra keywords for your product.
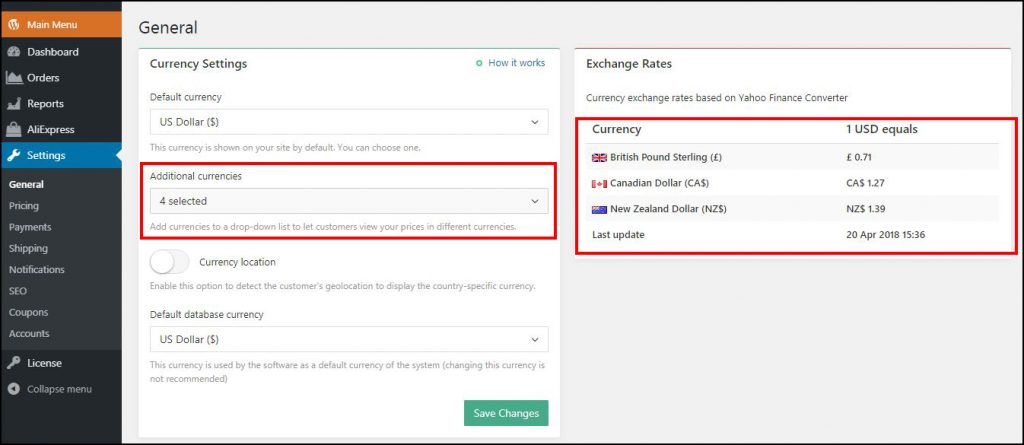
In the header section of your website create additional currencies of your target countries. You can do it in AliDropship plugin settings. Google Shopping shows your ads in two currencies – your feed price and price in the target country’s currency. But when your customers finally reach your website they will find your website more comfortable if they see the products with prices in their currencies. Enable “Currency location” option to detect the customer’s geolocation and display the country-specific currency.
Specific rules for those who use Google Shopping Add-on from AliDropship:
- Try to put “Size Chart” before your size chart if you use AliDropship add-on because it copies all the description before this collocation.
- In the variations, you have to put “Color” of your product, even if it is the only product on this page. Don’t use numbers or extra symbols in this variation. If it’s something multicolor, put several colors using slash symbol (Black/White/Red).
- If you have only thematic categories (Pusheen, Garfield, etc.), you need to also create your product categories (Hoodies, Mugs, T-Shirts, etc.) in order to generate product feed with the right product categories.
- In your “Size” attribute for shoes use only US sizes if you target country is the US.
All of these preparations will help you to make your Dropshipping Store more profitable! These extra tips actually cost us money and time. You get them for free!
- Automatic item update
It happens that sometimes you change your product prices on the website. Do you need to change prices in your feed all the time? Nope, if you set up automatic item update. It will take just a minute!
Go to your “Merchant Center” >> Home >> Automatic Item Updates and enable this function.
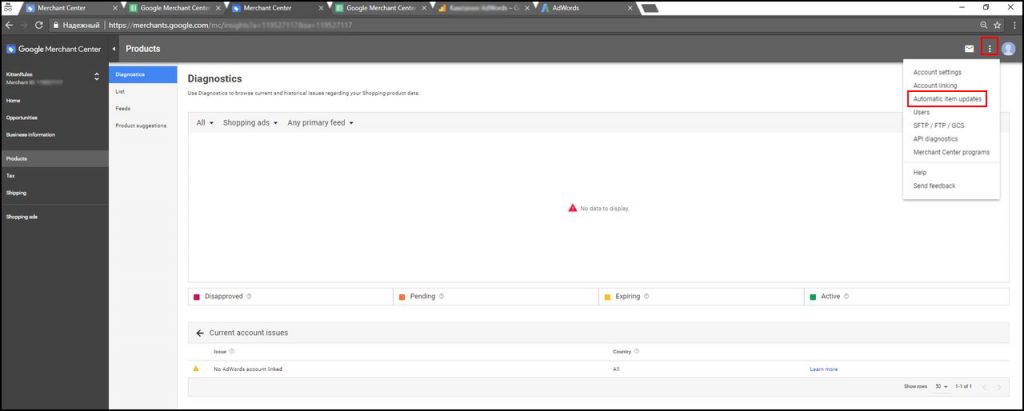
Enabling automatic item updates allows Google to update your items on Google Shopping based on the microdata information they find on your website. If you are not opted in this feature, they’ll instead temporarily disapprove those items with mismatched data. However, if you have changed more than 10% of your products prices at once, you need to change them manually in your feed or Google Merchant will disable this option for you.
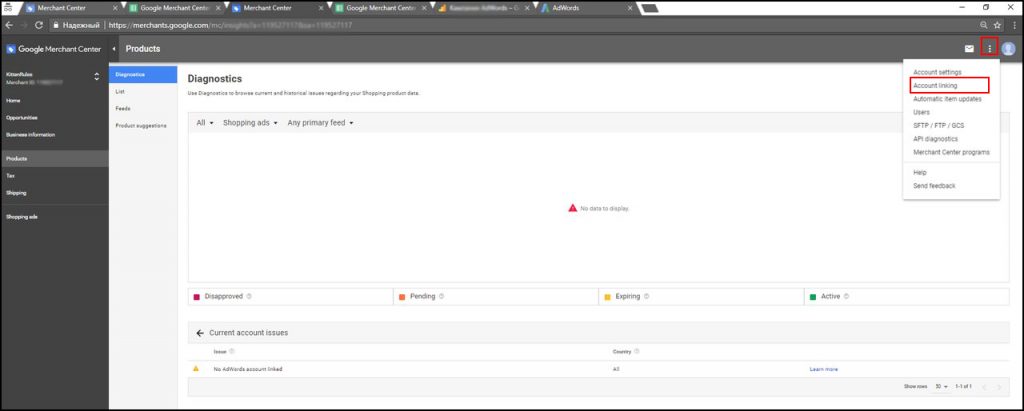
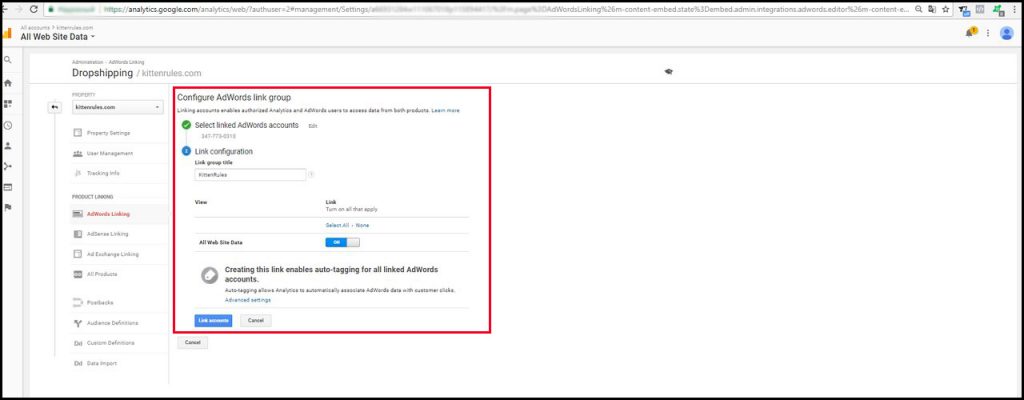
Step 6. Link Google Ads & Merchant Center accounts
By linking your Google Ads and Merchant Center accounts, you will be able to surface your products directly to users through Shopping ads. Your Merchant Center account can link to different Google and third-party platforms to help you extend your reach.
Step 7. Create and Launch Google Shopping Campaign
How to set up Google Shopping campaign in Ads? Go to your Google Ads Account to create your new Google Shopping campaign.
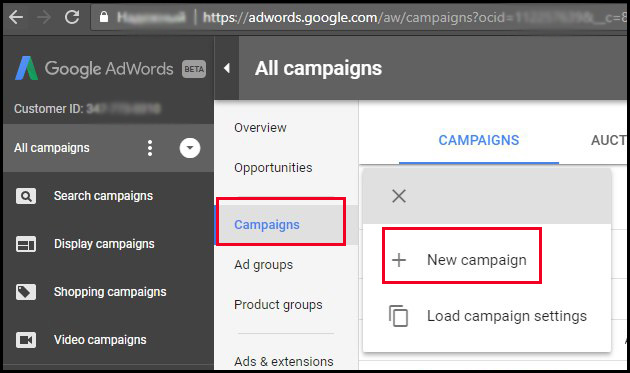
Select Campaigns >> New Campaign.

Then you should put the type of your future campaign. It is the “Shopping”.
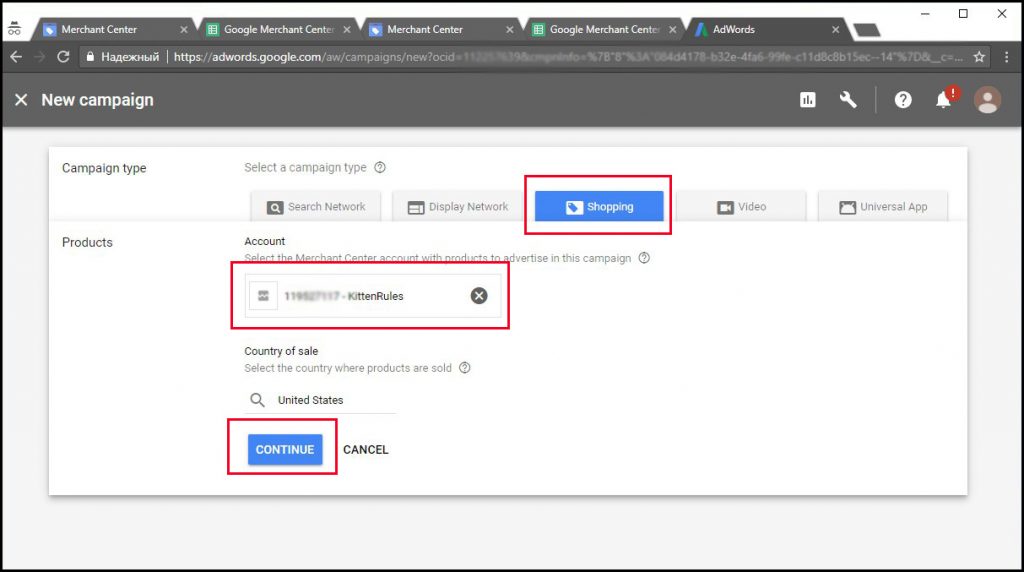
If you did everything correctly and according to the steps we’ve written for you above, you will be able to select your website.
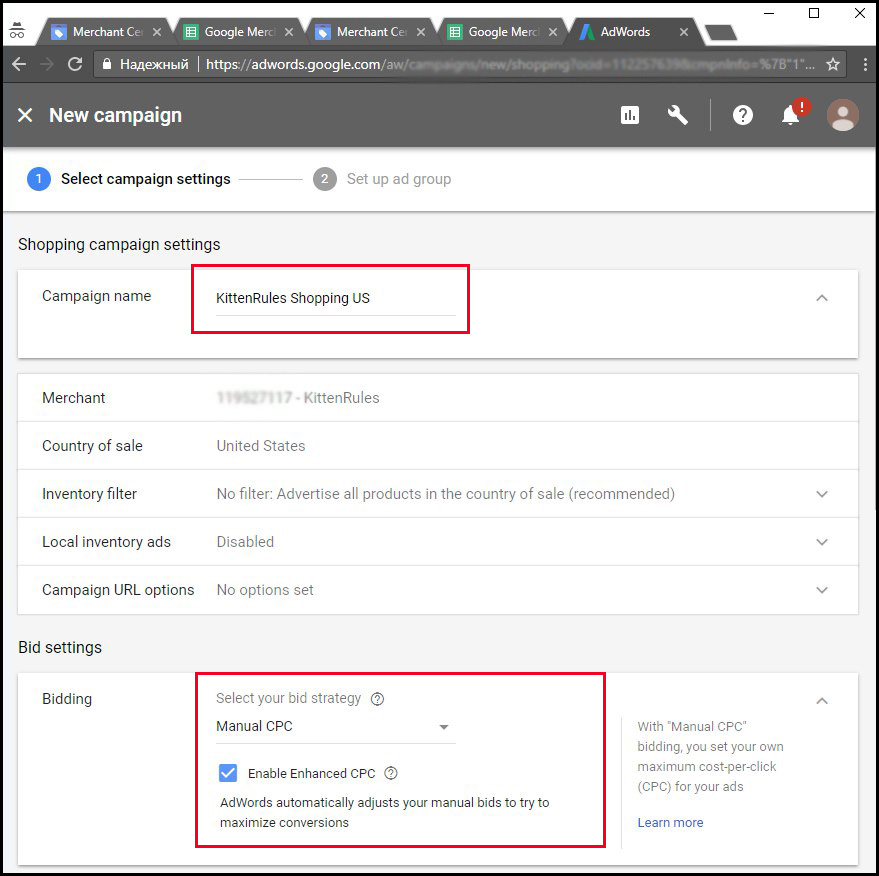
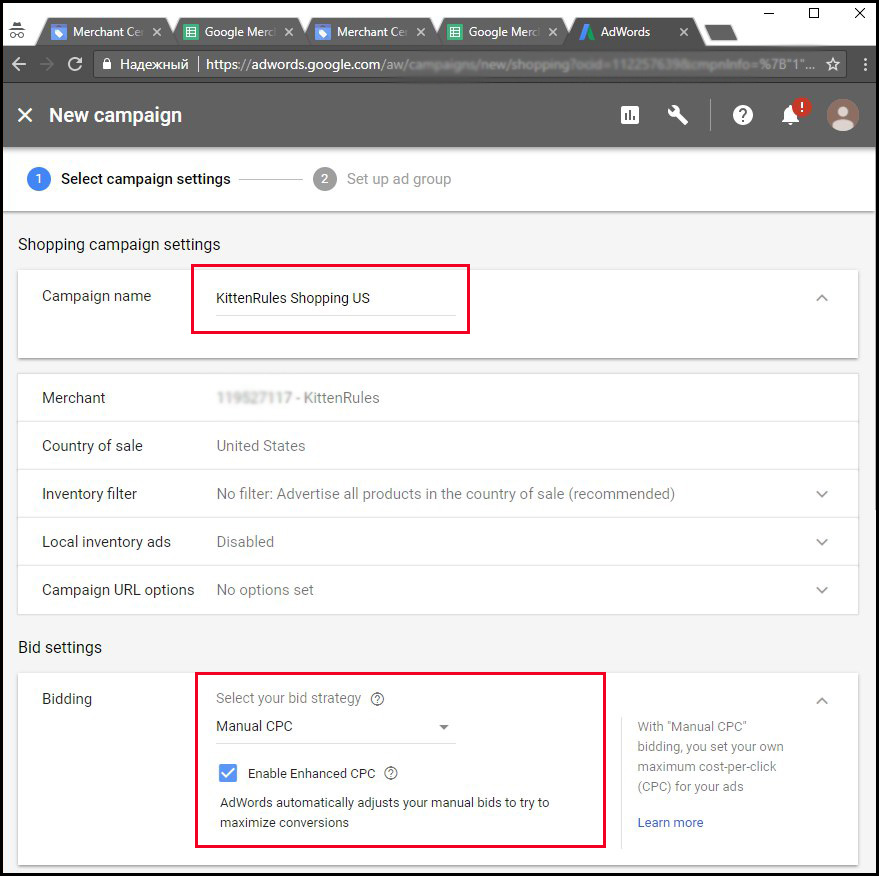
Now it’s time to set up all your settings. Put your campaign name, targeting country, bidding strategy. We advise you to select manual CPC where you can put your own maximum cost-per-click. Also, it would be great to let Google enable enhanced CPC. You will have to make campaigns for each country you want to target. You put your targeting country in the “Country of sale” section.
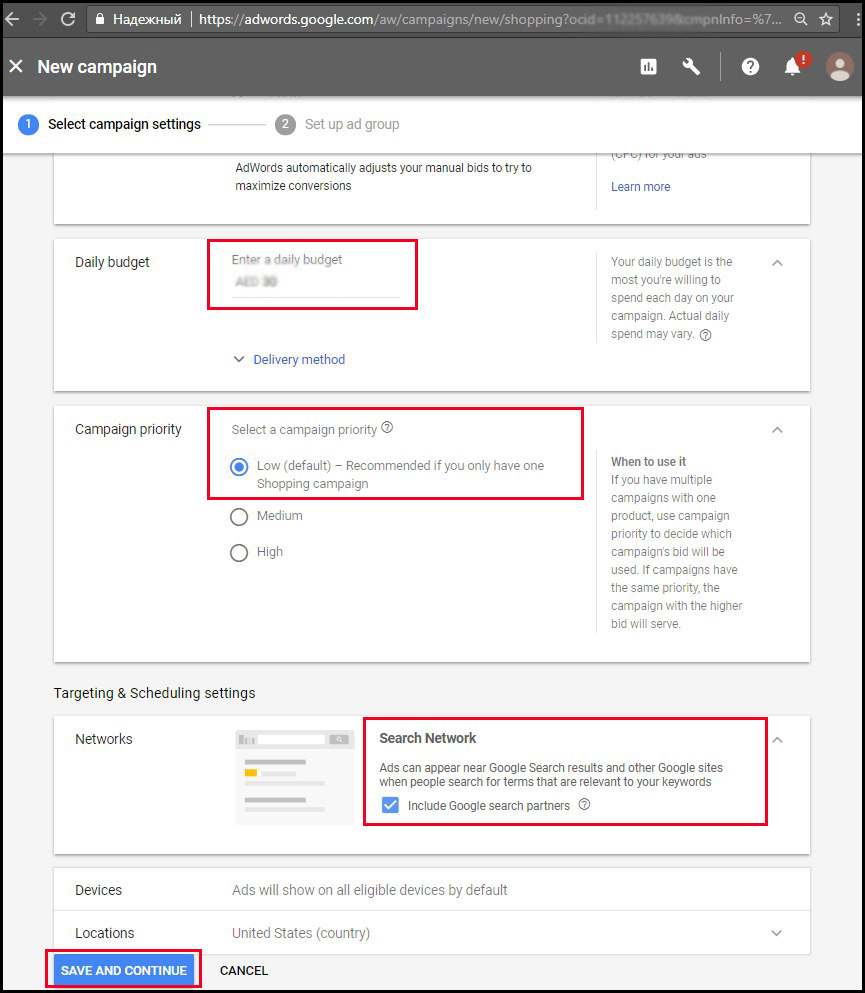
Select your daily budget and campaign priority. If you have only one shopping campaign – leave “Low” priority. If you have several – select your priority depending on your sales. Include Social Network to expand your placements. You will be able to change all of your settings any time you want.
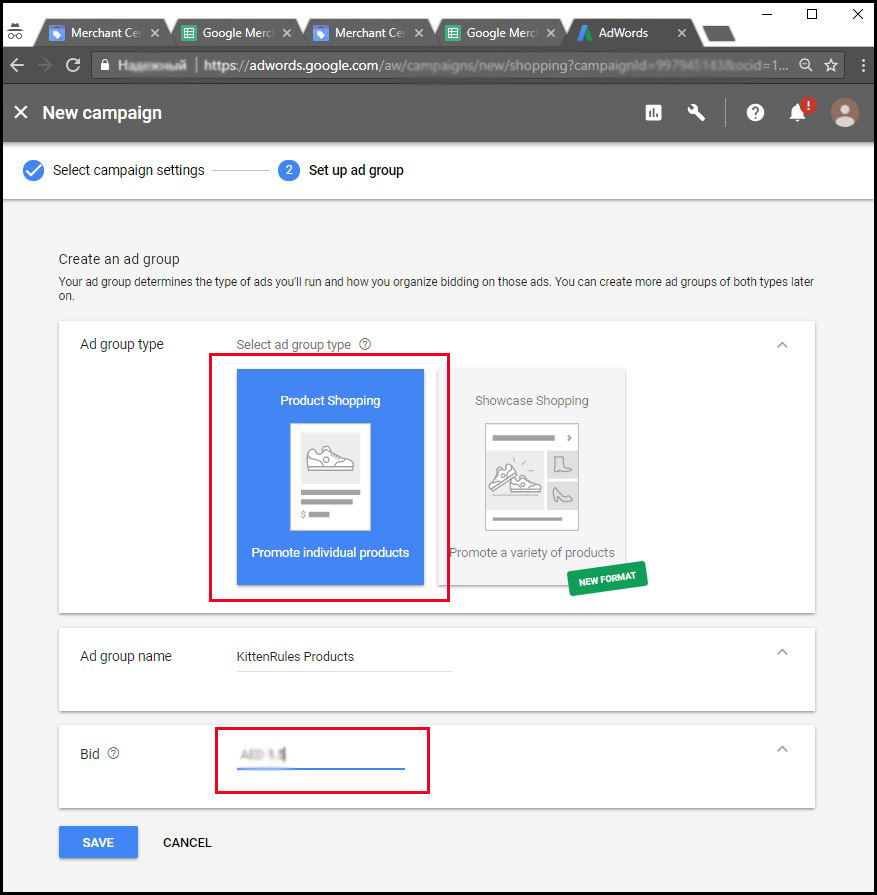
After you click “Save and Continue” you will start setting up your ad group where you also choose name and bid.
Great! You are on the homestretch in the showing your ads to your target audience. We recommend you to start your Shopping Ads with all of your products if you don’t have too much of them to find your best sellers and then exclude non-profitable ones. You will be able to change your bids for any of your products or product categories. We will write an additional article on Google Shopping Optimization a bit later if you need it (let us know in the comments). However, first of all, you need to test your products and collect some data.
Step 8. Analyze your Google Shopping Campaign Results
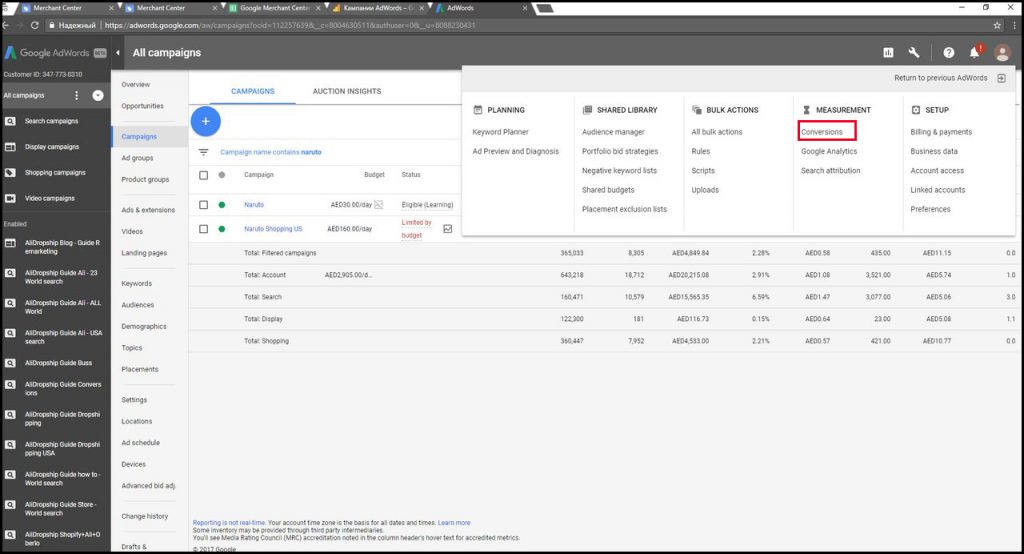
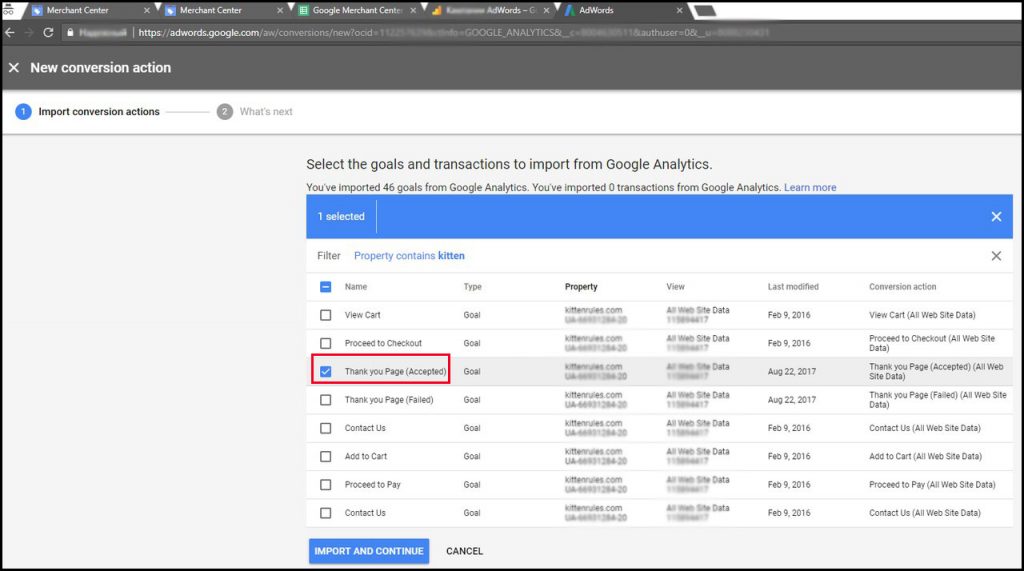
To collect the stats and be up-to-date with all of your results and expenses, you can check your goals in Google Analytics. Go to Measurement >> Conversions in your Google Ads Account.
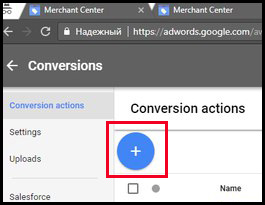
Then сlick Plus button.
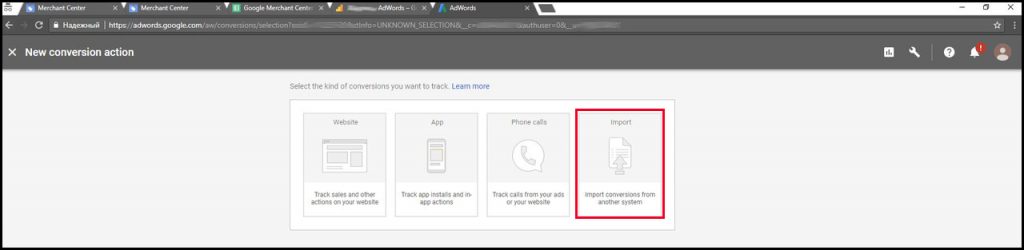
Right here you will see several kinds of conversion actions. You need to “Import” conversions from another platform.
Then you should select “Google Analytics”.
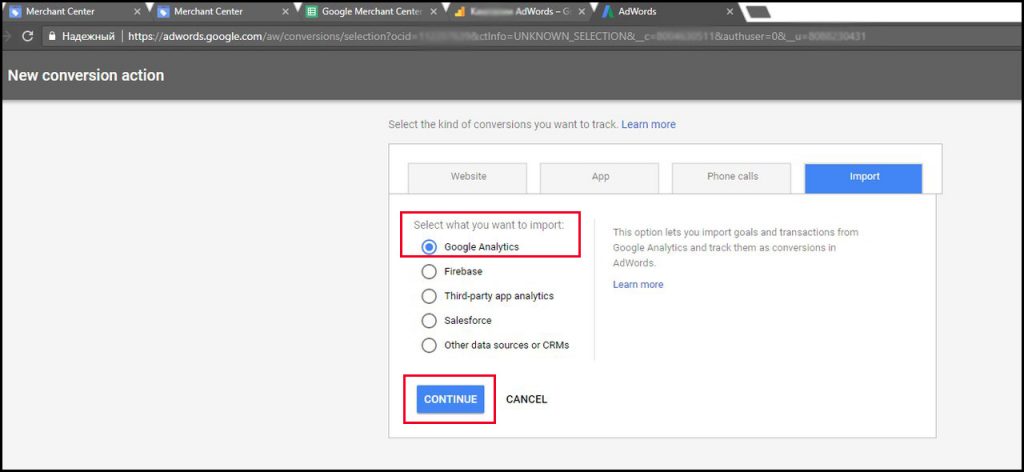
You will see all the goals, so select the most important ones: “Thank You Page (Accepted)”, “Add to cart” and any others you want to collect your data from.
Then go to Google Analytics and configure your Ads link group.
We want to congratulate you on the end of your set up process. Get ready for your sales boosting!
Do you know where to check the results after all? Open your Google Analytics account with your website data. Go to Traffic >> Google Ads >> Campaigns. Here you can choose your conversion type, dates and see all of the results and expenses.

If you want to learn which of your products are more “clickable” or “convertible”, you will find this information in Google Ads: All Campaigns >> Shopping Campaigns >> Products.
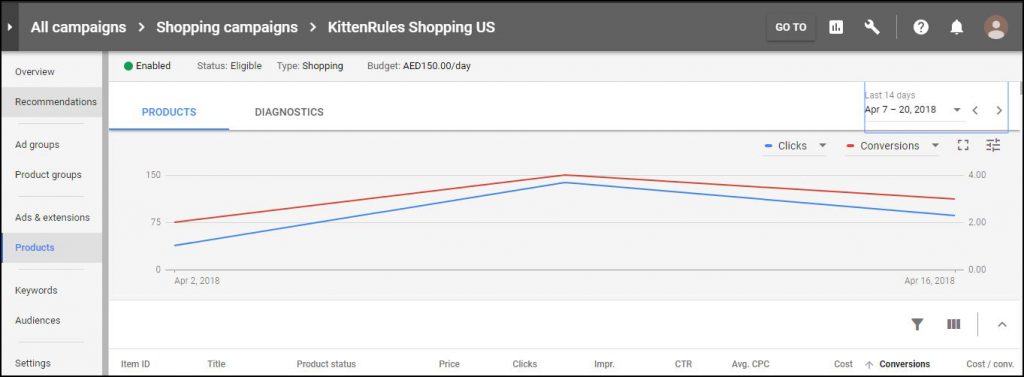
So far we can collect all of our data, edit products if they are clickable but not convertible and so on. This is the place where you can change your bids and exclude some categories if you need it. Be ready for some analytics. When you get enough data of your Shopping Ads performance, you can optimize your campaigns. We have the detailed guides on how to do that in our “Case Studies” articles. Update your account to a PRO to make your cost per conversions in Google Ads even smaller!
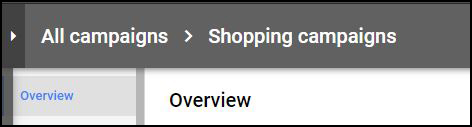
Also, you will find the information about your shopping campaigns in the “Overview” section. You will see your campaign results, most searchable keywords, etc.
And don’t forget to check the “Recommendations” section. Sometimes Google Ads gives you really nice recommendations and creates remarketing audiences for you.
Troubleshoot
Sometimes we make mistakes. Well, it really happens and we learn from them. In the dashboard of Google Merchant center, you can check and correct them. There you will also find automatic price updates after Google will fetch your product feed. Go to Products >> Diagnostics >> Item Issues.
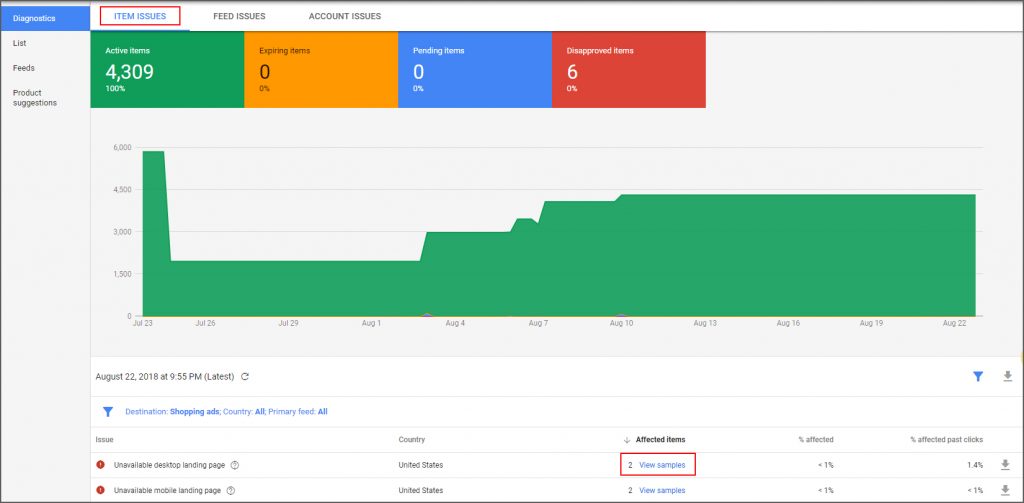
Right there you will find errors & warnings and, after clicking “view samples”, you can decide on how to resolve your problems.