Step 5.1. Create and set up your store accounts in social networks: Facebook Business Page
The most financially reliable audience can be found on Facebook. According to recent data, there are 2 age groups prevailing here: from 24 to 44 (67,9%) and 45+ (26,2%). As you see, 94.1% of Facebook users are adults. So, don’t miss an opportunity to get in touch with such a great audience and sell them your products! This guide will explain to you how to create a Facebook Business Page for this purpose.
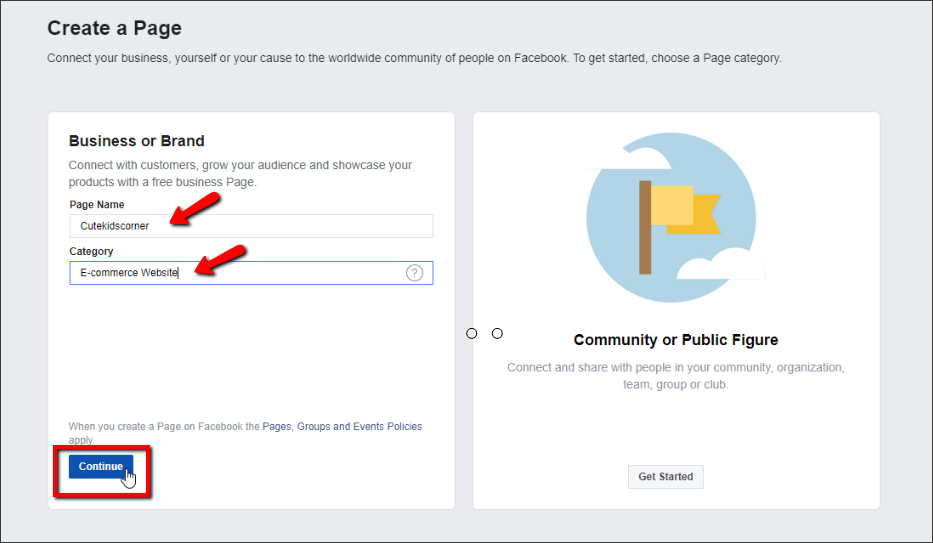
As an example, we will show our demo dropshipping store cutekidscorner.com.
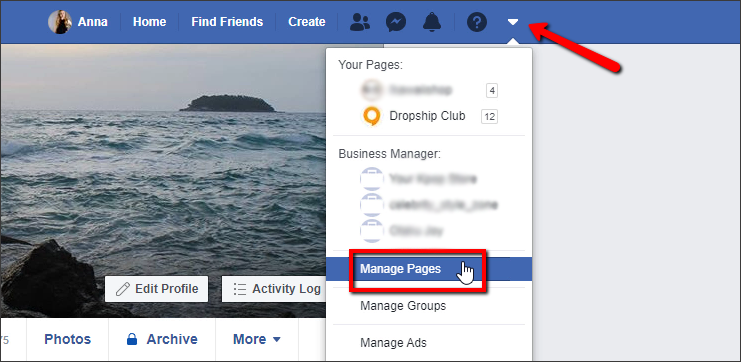
To start Business Page creation, go to the main Facebook page, click on the arrow button in the top right corner and select the ‘Manage Pages’ option.
Step 1. Choose your Business page category
The opened window will show you available Business Page types:
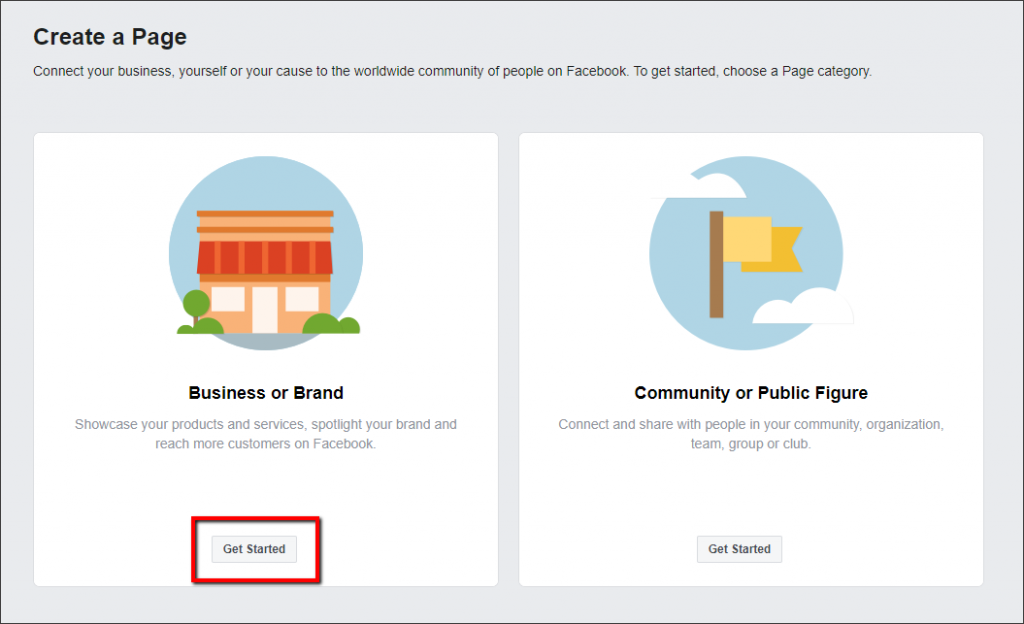
‘Business or Brand’ category is suitable for an online store – select it by clicking ‘Get Started’.
Step 2. Make up your Business Page name
All in all, the reason why you create a Business Page is to promote your dropshipping store. That’s why you need to name this page after it.
This name will be shown on Business Page right under the avatar and in all posts you publish.
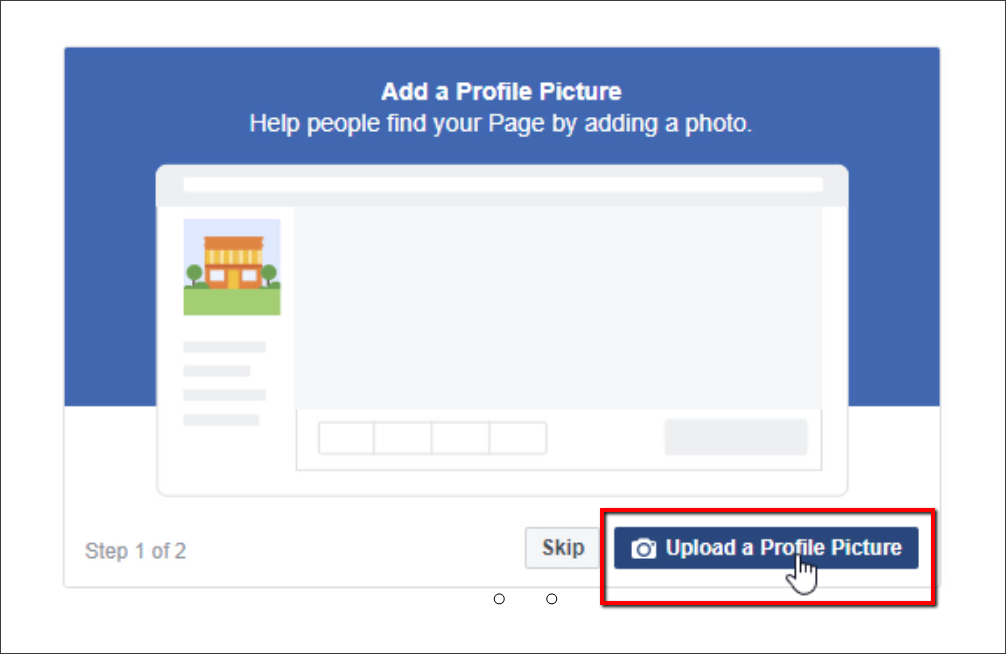
Step 3. Add a profile picture and a page cover
A profile picture is a pic displayed on the left of your page. As you’re going to promote your dropshipping store with this page, put your store’s logo as the photo.
Its size should be 170×170 px minimum (on a smartphone this photo will shrink to 128×128 px).
One of the most common problems you could face is the photo’s quality. Facebook contracts it, so to get the photo of higher resolution, upload it in png format.
To add a photo, click ‘Upload a Profile Picture’.
Then your Profile Picture will appear on your page and in your timeline.
Besides your store’s Business Page, this picture will be displayed next to ads you will launch via Facebook as well as next to all published posts.
Page cover photo
When users visit your page, the cover is the first thing they see. So, with its help, you have 3-5 seconds to explain to people what your page is about (or what you offer here).
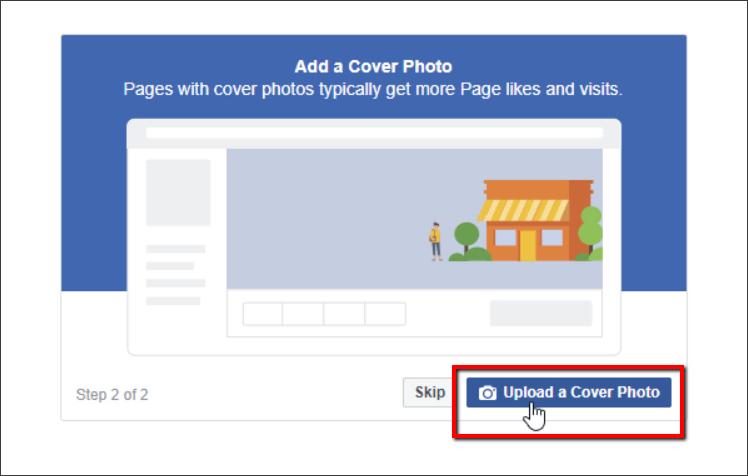
Just upload a picture of the right size – and it will appear on the page and in the timeline. The right cover should tell about your store’s focus and benefits. You can add some text to your page cover about what you sell.
What’s the size of the Facebook page cover?
At the moment, it is 820(W) x 312 (H) px.
If you visit the Facebook page from a smartphone, the cover will be cut to 640×360 px. Another part of the cover will not be seen. Keep this in mind when creating the cover picture for your store.
To save the quality of the cover, upload it in png format.
If you want to get additional traffic to your site, click on your page avatar and cover and add the link to your site in the description.
Step 4. Create a username for Business Page
In fact, a username is a web address (URL) of your Business Page. It is like a domain name of your site but only on Facebook.
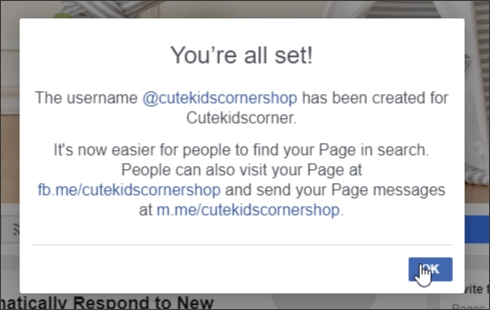
For example, our Facebook username will be ‘Cutekidscorner’.
What requirements usernames must meet:
- Username should be available (not in use);
- Only Latin letters, numerical symbols, and dots can be used;
- The maximum username length is 50 characters.
To create a username, click ‘Create Page @username’.

Enter a desired username in the opened window.
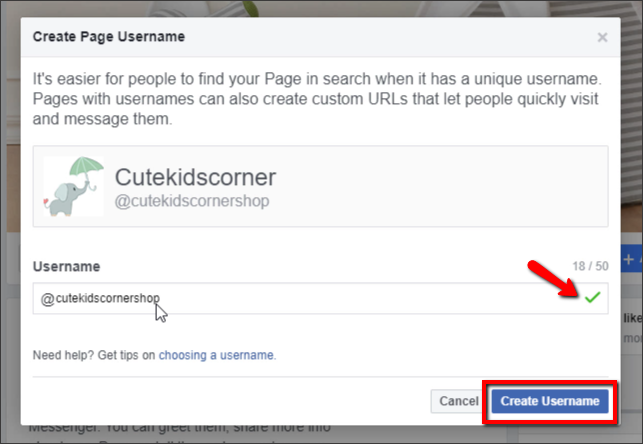
If it’s not in use and meet all requirements, you’ll see a green tick icon on the right. Push the ‘Create Username’ button.
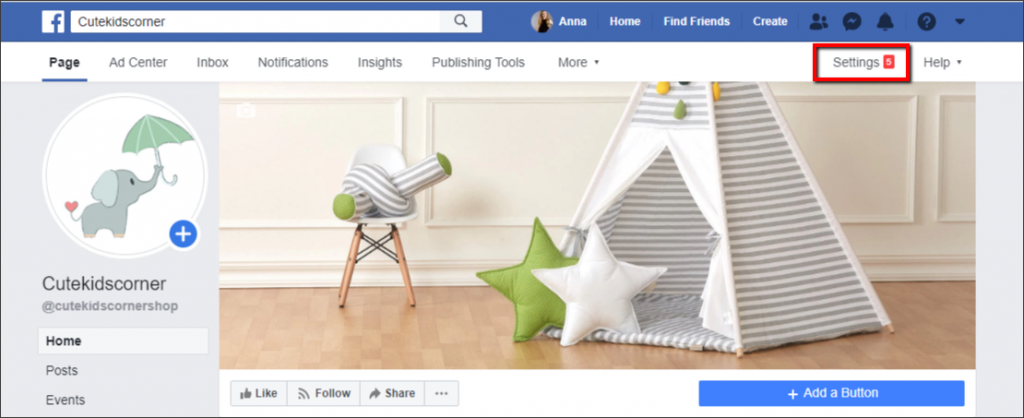
Step 5. Change your page settings
Now you should change your page info and settings. To proceed to page editing settings, select the ‘Settings’ tab in the top right corner.
Oh! What to do with all this stuff and how to edit your page correctly? Let’s look more closely at the main settings you will need.
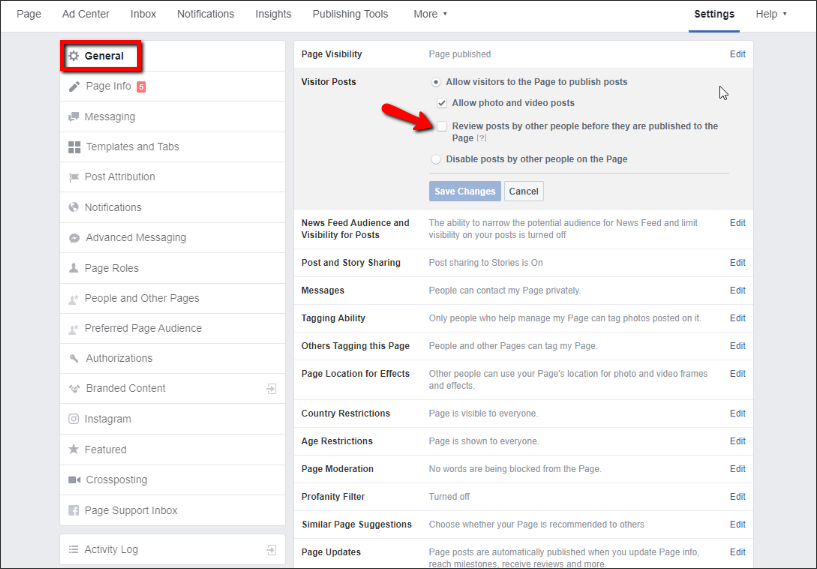
- General
Look through all the general settings and change some of them if needed. Here you can edit your page visibility settings, visitor posts settings, messages and tagging ability from your visitors, etc. We recommend ticking ‘Review posts by other people before they are published to the Page’. This way you’ll see your visitors’ posts before they are published.
Page visibility
All created pages are available for the public by default. If you want to hide your page, change visibility status by clicking ‘Edit’.
Messages
We strongly encourage you to allow people to send you messages. Your page will display your response speed.
Similar pages suggestions
A user might follow some pages similar to yours, and he’ll be offered to follow your page as well if you have this function turned on.
2. Page Info
After that move to the next tab ‘Page Info’ in the left menu to complete your about section.
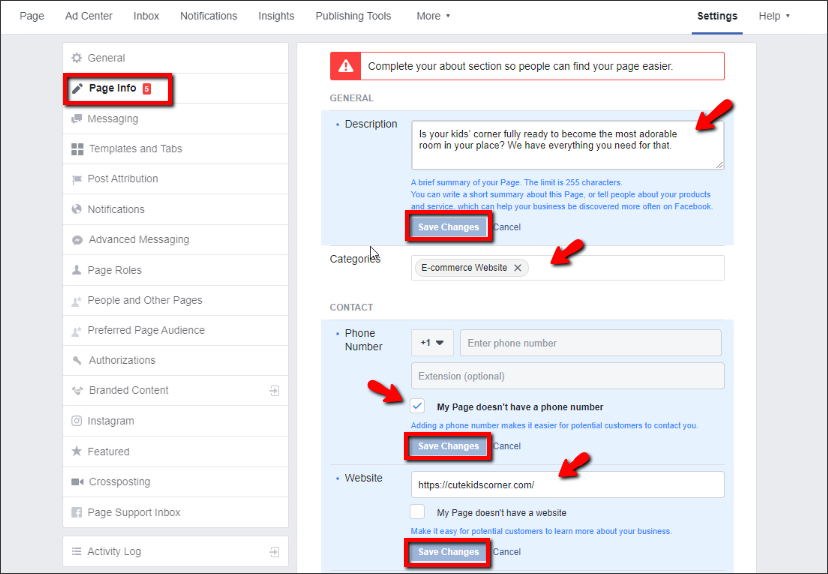
Fill in all necessary fields – info from them will be displayed on your Business page.
- General: Add a description text explaining what you can offer in your store. The limit is 255 characters. We select an ‘E-commerce Website’ category.
- Contact: Add your store phone number, URL, and email address.
- Location: Put your store address if you have any.
- Hours: Select ‘Always Open’ in the ‘Hours’ section as web stores are usually open 24/7.
- More: Fill in ‘Products’ you offer and put the link to your Privacy Policy page.
Don’t forget to save changes for each of the sections.
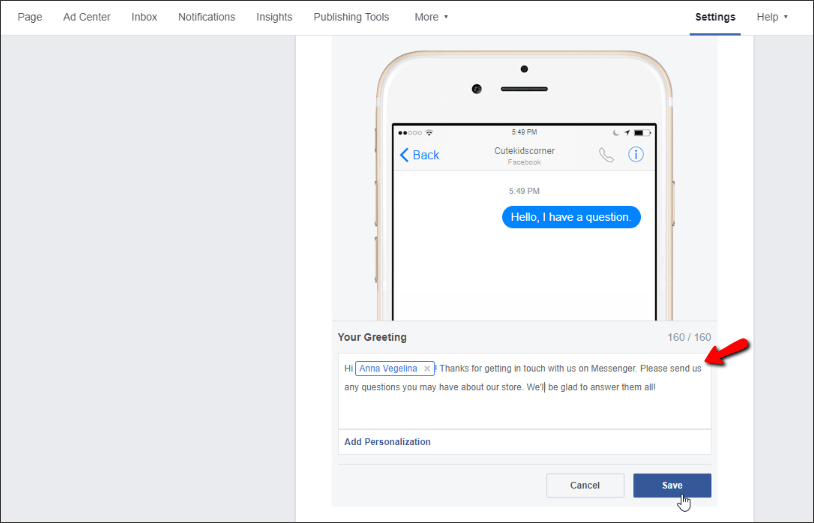
3. Messaging
Move to the ‘Messaging’ section and jump to the ‘Starting a Messenger Conversation’ Section.

Here you can create a greeting message for your page visitors with personalization. Turn it on. Greet people before they send you a message with their questions. No doubt, this function is extremely convenient! Automatic responses kinda tell visitors that this page is “alive” and they are answered back – all this increases trustability.
4. Templates and Tabs
On your page’s left, there’s a menu you can edit: add or delete menu items. You can edit these items yourself or choose one of the suggested templates. We believe that the most suitable of them is the ‘Shopping’ template (at least, for a dropshipping store). To add a menu item to it, press ‘Add a tab’.
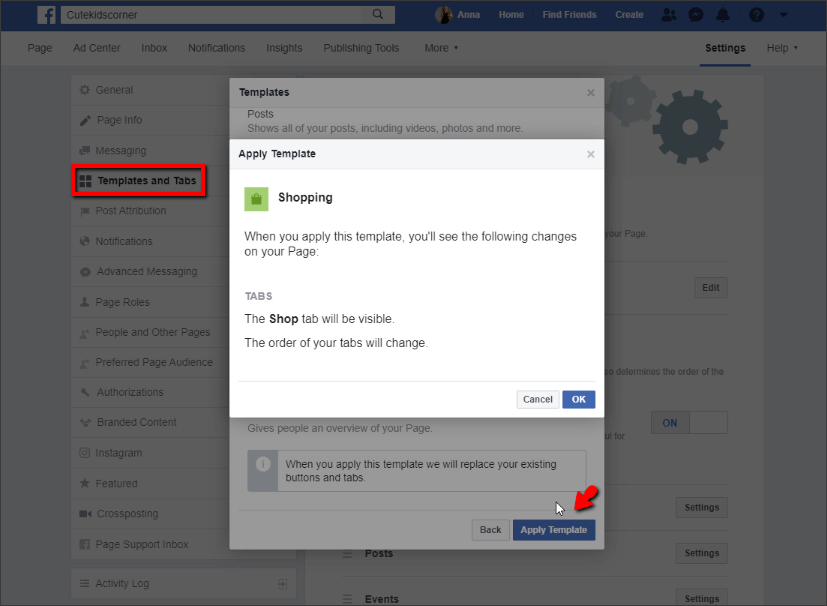
Now you can choose any additional tabs such as:
- Events
- Live Videos
- Notes
- Offers
- Services
- Shop
You can change the order of the tabs for your Home page in the same section.
5. Post Attribution
All the posts on your page are published on their author’s behalf (logo + name). So, it’s time to decide on whose behalf you want to publish posts: your (your personal account’s) or your page’s.
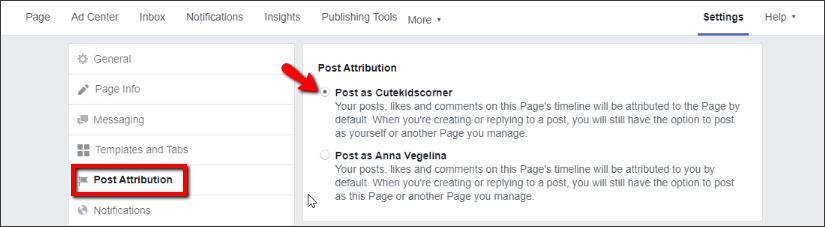
As you try to promote your dropshipping store, choose ‘Post as [Yourstorename]’.
6. Notifications
If you enter the ‘Notifications’ section you’ll see that you can change how and when to get notifications about any changes on your Facebook page.

We usually don’t turn any of these settings off except for ‘Text Messages’.
7. Page Roles
After your Business Page creation, you automatically become its administrator – a person who has the total control of the page.

If you want other people to control this page as well – to post content, for example – you can assign them special roles:
- Admin
- Editor
- Moderator
- Advertiser
- Analyst
Simply type a name and choose a role. This person should be your friend on Facebook. Each role gives certain authorities. For example, an editor is entitled to publish posts and answer comments; an advertiser, in his turn, is allowed to create and run ads but post publishing is not available for him.
Under no circumstances give someone your administrator role. Otherwise, a new administrator might get full control of the page, unassign your role and delete the page.
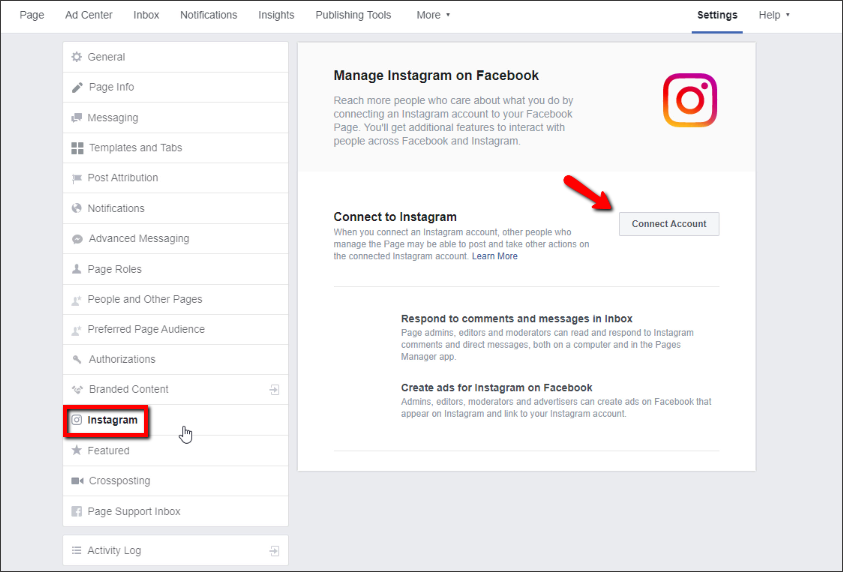
8. Instagram
If you already have an Instagram account for your store, you connect it to your Facebook page.
It’s simple: all you need is to connect your Instagram account to your Facebook Business Page. Just log in and enter your login and password.
If you don’t have an Instagram account, you can create one right here.
Click on the ‘Connect Account’ button.
Yay!
You’ve created a Business Page, but there’s no sense in promoting it or wait for any followers when it’s empty.
Step 6. Add a call-to-action button
Facebook has 5 categories with 1 or more button variants in each (12 variants in total).
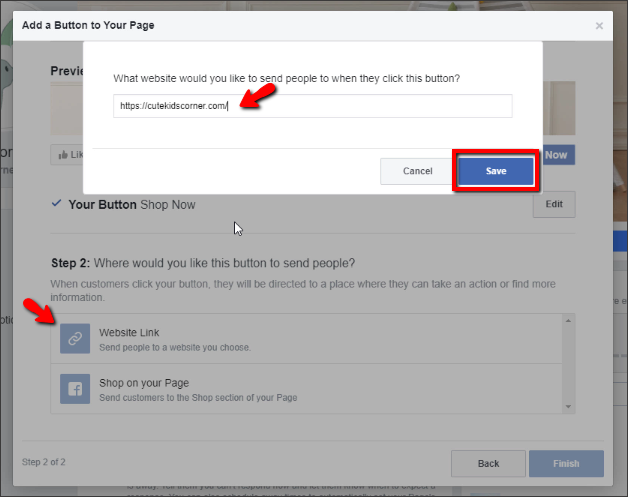
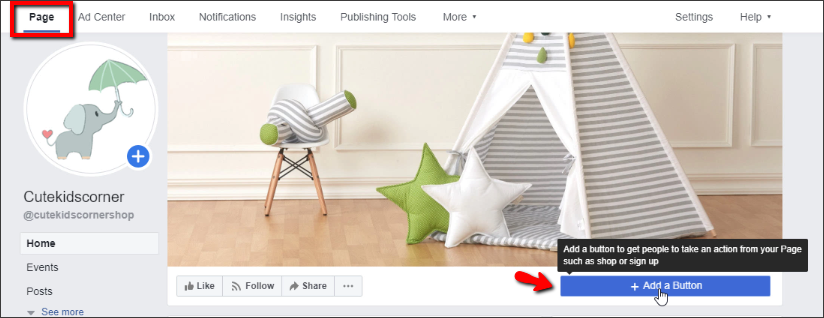 The most suitable button for a dropshipping store is ‘Shop Now’. To add this button, press the ‘Add a Button’ under your Facebook Page Cover.
Choose the needed call-to-action and paste the link to your site.
Step 7. Add your products to Shop and Offers
‘Shop’ and ‘Offers’ menu items are described below:
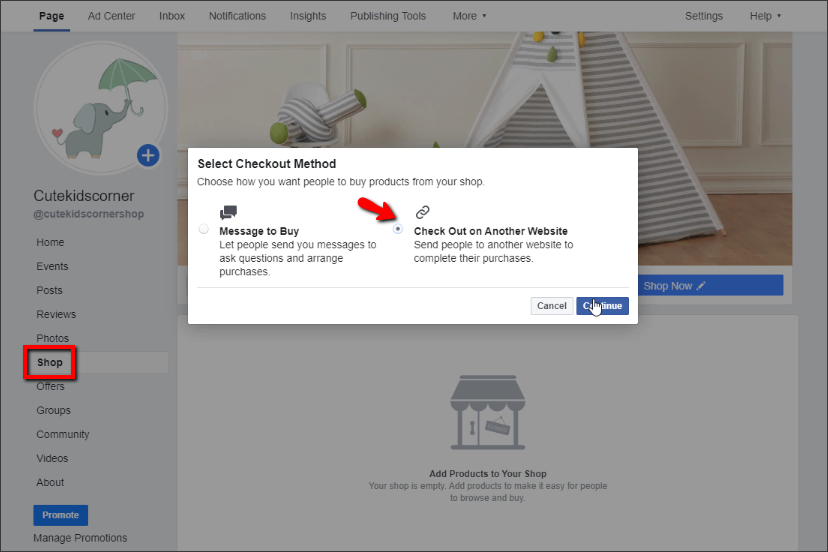
Shop
With this section, you’ll be able to place your products on your Business Page. When you add products to Facebook, they will be shown in this tab as well as in a separate section of your page.
Click ‘Shop’ in your page menu and select your checkout method: ‘Check Out on Another Website’. Then you’ll select your default currency and put the link to your website.
We recommend adding at least 10 of your products to a Facebook Shop. It’s not difficult. You’ll need to put your products’ pictures, titles, prices, links, and descriptions. Your product will be shared on Facebook and become visible after it will be approved by Facebook.
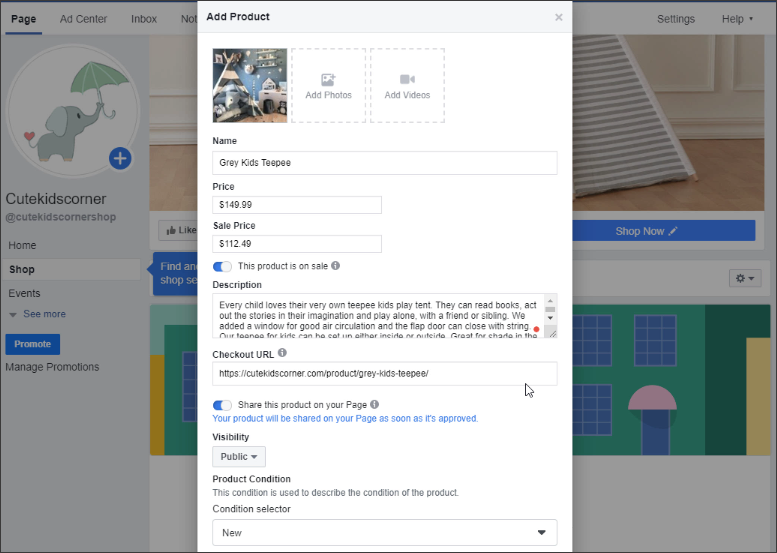
After a click on your product, a product card appears – it includes photo, title, price, description, share/save buttons and the link to your site.
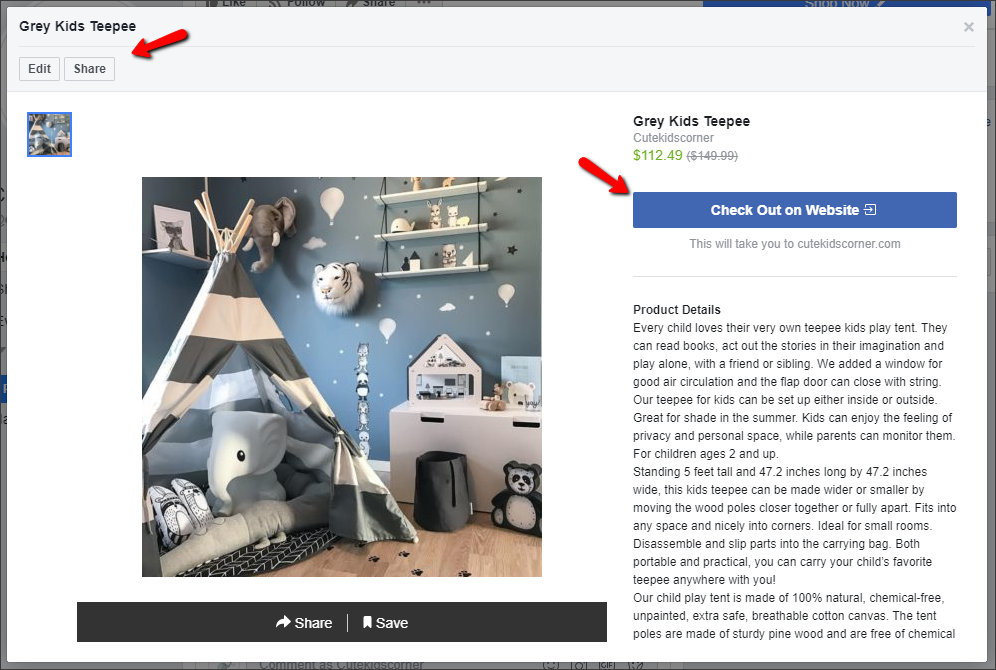
We advise you to add products to the Facebook shop section – in this case, you’ll attract more visitors to your site and get additional sales.
Offers
If you initiate sales or have special offers for your audience, make sure you use this feature.
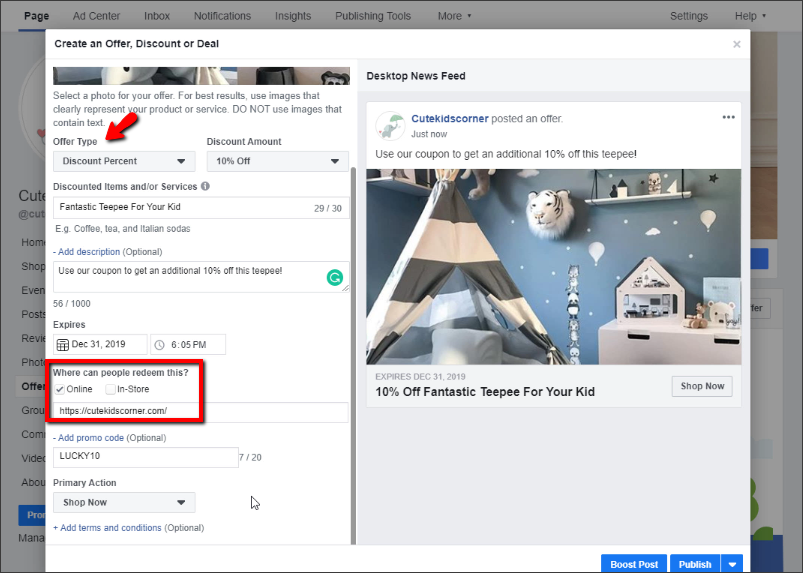
With the ‘Offers’ section, you can create advertising publications and promote them.
What we like about Offers is that you see how many people made use of them. Very handy!

The suggested menu items are not obligatory. If it’s your first time creating a Business Page, we recommend you to fill in all the info and only then to start editing menu items.
Step 8. Add posts to your page.
First, create some posts your audience would like: for example, tell them about the products you sell and special discounts.
Don’t forget to entertain your page visitors and make nice posts that would relate to your store theme. If you need any help with this step our experts will gladly manage your social media posts for you! Check our Engaging Social Media Posts for Your Store service!
Step 9. Like your page and invite friends to subscribe
If your page is not published yet, it’s high time to do that to get your first followers.
- Like your page from your personal account
Your friends will see that you like this page and some of them might follow it (this will work if you have many followers).
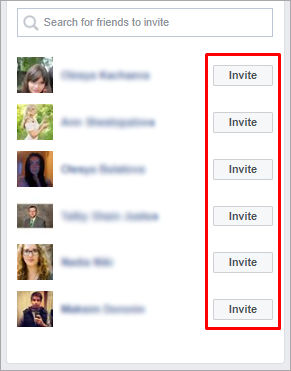
- Invite your friends to follow this page
Just go to the main page, and you’ll see your friends list with ‘Invite’ buttons. Click on those buttons to send personal invitations.
Congratulations! Now you not only have a Business Page but first followers as well!
If you want to know how to use your new-made Business Page to attract more customers to your site, read this article.
Conclusion
So, to create a Facebook Business Page for a dropshipping store, 9 steps have to be taken:
Step 1. Choose your Business page category
Step 2. Make up your Business Page name
Step 3. Add a profile picture and a page cover
Step 4. Create a username for Business Page
Step 5. Change your page settings
Step 6. Add a call-to-action button
Step 7. Add your products to Shop and Offers
Step 8. Add posts to your page.
Step 9. Like your page and invite friends to subscribe